User Interface
About this tutorial
This tutorial is free and open source, and all code uses the MIT license - so you are free to do with it as you like. My hope is that you will enjoy the tutorial, and make great games!
If you enjoy this and would like me to keep writing, please consider supporting my Patreon.
In this chapter, we'll add a user interface to the game.
Shrinking the map
We'll start off by going to map.rs, and adding some constants: MAPWIDTH, MAPHEIGHT and MAPCOUNT:
#![allow(unused)]
fn main() {
const MAPWIDTH : usize = 80;
const MAPHEIGHT : usize = 50;
const MAPCOUNT : usize = MAPHEIGHT * MAPWIDTH;
}
Then we'll go through and change every reference to 80*50 to MAPCOUNT, and references to the map size to use the constants. When this is done and running, we'll change the MAPHEIGHT to 43 - to give us room at the bottom of the screen for a user interface panel.
Some minimal GUI elements
We'll create a new file, gui.rs to hold our code. We'll go with a really minimal start:
#![allow(unused)]
fn main() {
use rltk::{ RGB, Rltk, Console };
use specs::prelude::*;

pub fn draw_ui(ecs: &World, ctx : &mut Rltk) {
    ctx.draw_box(0, 43, 79, 6, RGB::named(rltk::WHITE), RGB::named(rltk::BLACK));
}
}
We add a mod gui to the import block at the top of main.rs, and call it at the end of tick:
#![allow(unused)]
fn main() {
gui::draw_ui(&self.ecs, ctx);
}
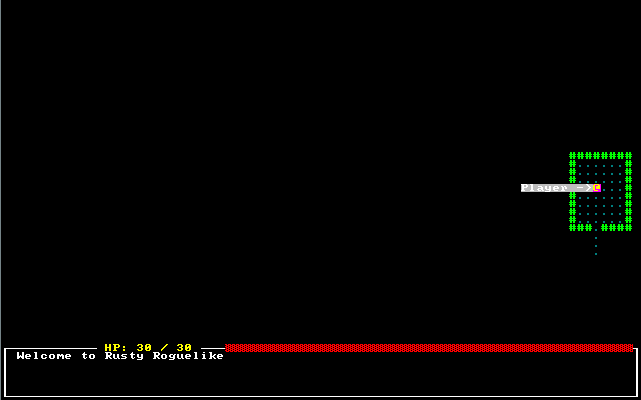
If we cargo run now, we'll see that the map has shrunk - and we have a white box in place for the panel.
Adding a health bar
It would help the player out to know how much health they have left. Fortunately, RLTK provides a convenient helper for this. We'll need to obtain the player's health from the ECS, and render it. This is pretty easy, and you should be comfortable with it by now. The code looks like this:
#![allow(unused)]
fn main() {
use rltk::{ RGB, Rltk, Console };
use specs::prelude::*;
use super::{CombatStats, Player};

pub fn draw_ui(ecs: &World, ctx : &mut Rltk) {
    ctx.draw_box(0, 43, 79, 6, RGB::named(rltk::WHITE), RGB::named(rltk::BLACK));

    let combat_stats = ecs.read_storage::<CombatStats>();
    let players = ecs.read_storage::<Player>();
    for (_player, stats) in (&players, &combat_stats).join() {
        let health = format!(" HP: {} / {} ", stats.hp, stats.max_hp);
        ctx.print_color(12, 43, RGB::named(rltk::YELLOW), RGB::named(rltk::BLACK), &health);

        ctx.draw_bar_horizontal(28, 43, 51, stats.hp, stats.max_hp, RGB::named(rltk::RED), RGB::named(rltk::BLACK));
    }
}
}
Adding a message log
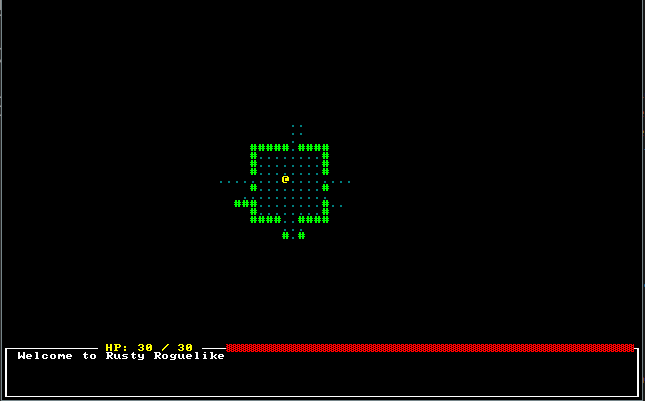
The game log makes sense as a resource: it's available to any system that wants to tell you something, and there's very little restriction as to what might want to tell you something. We'll start by modelling the log itself. Make a new file, gamelog.rs. We'll start very simply:
#![allow(unused)]
fn main() {
pub struct GameLog {
    pub entries : Vec<String>
}
}
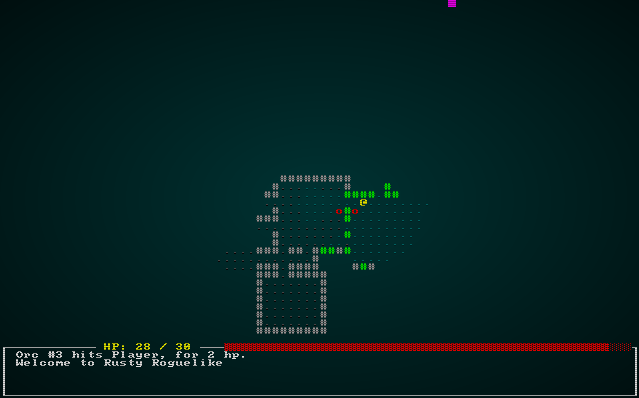
In main.rs we add a mod gamelog; line, and insert it as a resource with gs.ecs.insert(gamelog::GameLog{ entries : vec!["Welcome to Rusty Roguelike".to_string()] });. We're inserting a line into the log file at the start, using the vec! macro for constructing vectors. That gives us something to display - so we'll start writing the log display code in gui.rs. In our GUI drawing function, we simply add:
#![allow(unused)]
fn main() {
let log = ecs.fetch::<GameLog>();

let mut y = 44;
for s in log.entries.iter().rev() {
    if y < 49 { ctx.print(2, y, s); }
    y += 1;
}
}
If you cargo run the project now, you'll see something like this:
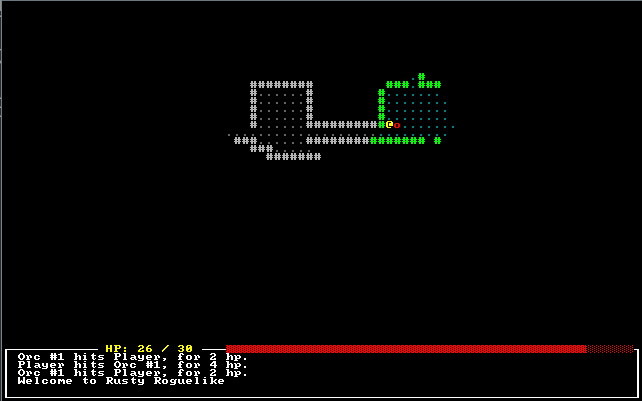
Logging attacks
In our melee_combat_system, we add gamelog::GameLog to our imports from super, add a read/write accessor for the log (WriteExpect<'a, GameLog>,), and extend the destructuring to include it: let (entities, mut log, mut wants_melee, names, combat_stats, mut inflict_damage) = data;. Then it's just a matter of replacing the print! macros with inserting into the game log. Here's the resultant code:
#![allow(unused)]
fn main() {
use specs::prelude::*;
use super::{CombatStats, WantsToMelee, Name, SufferDamage, gamelog::GameLog};

pub struct MeleeCombatSystem {}

impl<'a> System<'a> for MeleeCombatSystem {
    #[allow(clippy::type_complexity)]
    type SystemData = ( Entities<'a>,
                        WriteExpect<'a, GameLog>,
                        WriteStorage<'a, WantsToMelee>,
                        ReadStorage<'a, Name>,
                        ReadStorage<'a, CombatStats>,
                        WriteStorage<'a, SufferDamage>
                      );

    fn run(&mut self, data : Self::SystemData) {
        let (entities, mut log, mut wants_melee, names, combat_stats, mut inflict_damage) = data;

        for (_entity, wants_melee, name, stats) in (&entities, &wants_melee, &names, &combat_stats).join() {
            if stats.hp > 0 {
                let target_stats = combat_stats.get(wants_melee.target).unwrap();
                if target_stats.hp > 0 {
                    let target_name = names.get(wants_melee.target).unwrap();

                    let damage = i32::max(0, stats.power - target_stats.defense);

                    if damage == 0 {
                        log.entries.push(format!("{} is unable to hurt {}", &name.name, &target_name.name));
                    } else {
                        log.entries.push(format!("{} hits {}, for {} hp.", &name.name, &target_name.name, damage));
                        SufferDamage::new_damage(&mut inflict_damage, wants_melee.target, damage);
                    }
                }
            }
        }

        wants_melee.clear();
    }
}
}
Now if you run the game and play a bit (cargo run, playing is up to you!), you'll see combat messages in the log:
Notifying of deaths
We can do the same thing with delete_the_dead to notify of deaths. Here's the finished code:
#![allow(unused)]
fn main() {
pub fn delete_the_dead(ecs : &mut World) {
    let mut dead : Vec<Entity> = Vec::new();
    // Using a scope to make the borrow checker happy
    {
        let combat_stats = ecs.read_storage::<CombatStats>();
        let players = ecs.read_storage::<Player>();
        let names = ecs.read_storage::<Name>();
        let entities = ecs.entities();
        let mut log = ecs.write_resource::<GameLog>();
        for (entity, stats) in (&entities, &combat_stats).join() {
            if stats.hp < 1 {
                let player = players.get(entity);
                match player {
                    None => {
                        let victim_name = names.get(entity);
                        if let Some(victim_name) = victim_name {
                            log.entries.push(format!("{} is dead", &victim_name.name));
                        }
                        dead.push(entity)
                    }
                    Some(_) => console::log("You are dead")
                }
            }
        }
    }

    for victim in dead {
        ecs.delete_entity(victim).expect("Unable to delete");
    }
}
}
Mouse Support and Tooltips
Let's start by looking at how we obtain mouse information from RLTK. It's really easy; add the following at the bottom of your draw_ui function:
#![allow(unused)]
fn main() {
// Draw mouse cursor
let mouse_pos = ctx.mouse_pos();
ctx.set_bg(mouse_pos.0, mouse_pos.1, RGB::named(rltk::MAGENTA));
}
This sets the background of the cell at which the mouse is pointed to magenta. As you can see, mouse information arrives from RLTK as part of the context.
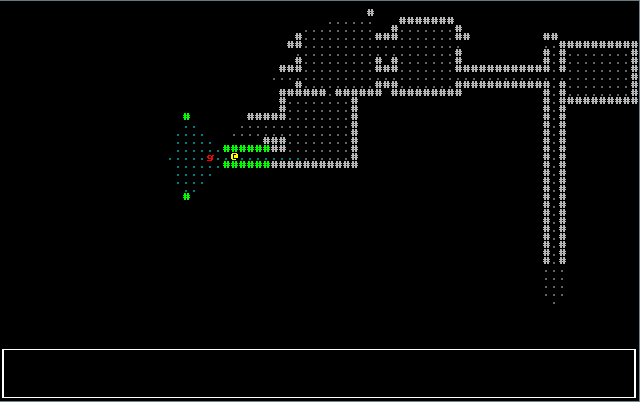
Now we'll introduce a new function, draw_tooltips and call it at the end of draw_ui. New new function looks like this:
#![allow(unused)]
fn main() {
fn draw_tooltips(ecs: &World, ctx : &mut Rltk) {
    let map = ecs.fetch::<Map>();
    let names = ecs.read_storage::<Name>();
    let positions = ecs.read_storage::<Position>();

    let mouse_pos = ctx.mouse_pos();
    if mouse_pos.0 >= map.width || mouse_pos.1 >= map.height { return; }
    let mut tooltip : Vec<String> = Vec::new();
    for (name, position) in (&names, &positions).join() {
        let idx = map.xy_idx(position.x, position.y);
        if position.x == mouse_pos.0 && position.y == mouse_pos.1 && map.visible_tiles[idx] {
            tooltip.push(name.name.to_string());
        }
    }

    if !tooltip.is_empty() {
        let mut width :i32 = 0;
        for s in tooltip.iter() {
            if width < s.len() as i32 { width = s.len() as i32; }
        }
        width += 3;

        if mouse_pos.0 > 40 {
            let arrow_pos = Point::new(mouse_pos.0 - 2, mouse_pos.1);
            let left_x = mouse_pos.0 - width;
            let mut y = mouse_pos.1;
            for s in tooltip.iter() {
                ctx.print_color(left_x, y, RGB::named(rltk::WHITE), RGB::named(rltk::GREY), s);
                let padding = (width - s.len() as i32)-1;
                for i in 0..padding {
                    ctx.print_color(arrow_pos.x - i, y, RGB::named(rltk::WHITE), RGB::named(rltk::GREY), &" ".to_string());
                }
                y += 1;
            }
            ctx.print_color(arrow_pos.x, arrow_pos.y, RGB::named(rltk::WHITE), RGB::named(rltk::GREY), &"->".to_string());
        } else {
            let arrow_pos = Point::new(mouse_pos.0 + 1, mouse_pos.1);
            let left_x = mouse_pos.0 +3;
            let mut y = mouse_pos.1;
            for s in tooltip.iter() {
                ctx.print_color(left_x + 1, y, RGB::named(rltk::WHITE), RGB::named(rltk::GREY), s);
                let padding = (width - s.len() as i32)-1;
                for i in 0..padding {
                    ctx.print_color(arrow_pos.x + 1 + i, y, RGB::named(rltk::WHITE), RGB::named(rltk::GREY), &" ".to_string());
                }
                y += 1;
            }
            ctx.print_color(arrow_pos.x, arrow_pos.y, RGB::named(rltk::WHITE), RGB::named(rltk::GREY), &"<-".to_string());
        }
    }
}
}
It starts by obtaining read access to the components we need for tooltips: names and positions. It also gets read access to the map itself. Then we check that mouse cursor is actually on the map, and bail out if it isn't - no point in trying to draw tooltips for something that can never have any!
The remainder says "if we have any tooltips, look at the mouse position" - if its on the left, we'll put the tooltip to the right, otherwise to the left.
If you cargo run your project now, it looks like this:
Optional post-processing for that truly retro feeling
Since we're on look and feel, lets consider enabling an RLTK feature: post-processing to give scanlines and screen burn, for that truly retro feel. It's entirely up to you if you want to use this! In main.rs, the initial setup simply replaced the first init command with:
#![allow(unused)]
fn main() {
use rltk::RltkBuilder;
    let mut context = RltkBuilder::simple80x50()
        .with_title("Roguelike Tutorial")
        .build()?;
context.with_post_scanlines(true);
}
If you choose to do this, the game looks a bit like the classic Caves of Qud:
Wrap up
Now that we have a GUI, it's starting to look pretty good!
The source code for this chapter may be found here
Run this chapter's example with web assembly, in your browser (WebGL2 required)
Copyright (C) 2019, Herbert Wolverson.