Chapter 3 - Walking a Map
About this tutorial
This tutorial is free and open source, and all code uses the MIT license - so you are free to do with it as you like. My hope is that you will enjoy the tutorial, and make great games!
If you enjoy this and would like me to keep writing, please consider supporting my Patreon.

The remainder of this tutorial will be dedicated to making a Roguelike. [Rogue](https://en.wikipedia.org/wiki/Rogue_(video_game) appeared in 1980, as a text-mode dungeon exploration game. It has spawned an entire genre of "roguelikes": procedurally generated maps, hunting an objective over multiple levels and "permadeath" (restart when you die). The definition is the source of many online fights; I'd rather avoid that!
A Roguelike without a map to explore is a bit pointless, so in this chapter we'll put together a basic map, draw it, and let your player walk around a bit. We're starting with the code from chapter 2, but with the red smiley faces (and their leftward tendencies) removed.
Defining the map tiles
We'll start by allowing two tile types: walls and floors. We can represent this with an enum (to learn more about enumerations, The Rust Book has a large section on them):
#![allow(unused)]
fn main() {
#[derive(PartialEq, Copy, Clone)]
enum TileType {
    Wall, Floor
}
}
Notice that we've included some derived features (more usage of derive macros, this time built into Rust itself): Copy and Clone. Clone adds a .clone() method to the type, allowing a copy to be made programmatically. Copy changes the default from moving the object on assignment to making a copy - so tile1 = tile2 leaves both values valid and not in a "moved from" state.
PartialEq allows us to use == to see if two tile types match. If we didn't derive these features, if tile_type == TileType::Wall would fail to compile!
Building a simple map
Now we'll make a function that returns a vec (vector) of tiles, representing a simple map. We'll use a vector sized to the whole map, which means we need a way to figure out which array index is at a given x/y position. So first, we make a new function xy_idx:
#![allow(unused)]
fn main() {
pub fn xy_idx(x: i32, y: i32) -> usize {
    (y as usize * 80) + x as usize
}
}
This is simple: it multiplies the y position by the map width (80), and adds x. This guarantees one tile per location, and efficiently maps it in memory for left-to-right reading.
We're using a Rust function shorthand here. Notice that the function returns a usize (equivalent to size_t in C/C++ - whatever the basic size type used for a platform is) - and the function body lacks a ; at the end? Any function that ends with a statement that lacks a semicolon treats that line as a return statement. So it's the same as typing return (y as usize * 80) + x as usize. This comes from the Rust author's other favorite language, ML - which uses the same shorthand. It's considered "Rustacean" (canonical Rust; I always picture a Rust Monster with cute little claws and shell) to use this style, so we've adopted it for the tutorial.
Then we write a constructor function to make a map:
#![allow(unused)]
fn main() {
fn new_map() -> Vec<TileType> {
    let mut map = vec![TileType::Floor; 80*50];

    // Make the boundaries walls
    for x in 0..80 {
        map[xy_idx(x, 0)] = TileType::Wall;
        map[xy_idx(x, 49)] = TileType::Wall;
    }
    for y in 0..50 {
        map[xy_idx(0, y)] = TileType::Wall;
        map[xy_idx(79, y)] = TileType::Wall;
    }

    // Now we'll randomly splat a bunch of walls. It won't be pretty, but it's a decent illustration.
    // First, obtain the thread-local RNG:
    let mut rng = rltk::RandomNumberGenerator::new();

    for _i in 0..400 {
        let x = rng.roll_dice(1, 79);
        let y = rng.roll_dice(1, 49);
        let idx = xy_idx(x, y);
        if idx != xy_idx(40, 25) {
            map[idx] = TileType::Wall;
        }
    }

    map
}
}
There's a fair amount of syntax that we haven't encountered before here, so lets break this down:
fn new_map() -> Vec<TileType>species a function namednew_map. It doesn't take any parameters, so it can be called from anywhere.- It returns a
Vec.Vecis a Rust Vector (if you're familiar with C++, it's pretty much exactly the same as a C++std::vector). A vector is like an array (see this Rust by Example chapter), which lets you put a bunch of data into a list and access each element. Unlike an array, aVecdoesn't have a size limit - and the size can change while the program runs. So you canpush(add) new items, andremovethem as you go. Rust by Example has a great chapter on Vectors; it's a good idea to learn about them - they are used everywhere. let mut map = vec![TileType::Floor; 80*50];is a confusing looking statement! Lets break it down:let mut mapis saying "make a new variable" (let), "let me change it" (mut) and call it "map".vec!is a macro, another one build into the Rust standard library. The exclamation mark is Rust's way of saying "this is a procedural macro" (as opposed to a derive macro, like we've seen before). Procedural macros run like a function - they define a procedure, they just greatly reduce your typing.- The
vec!macro takes its parameters in square brackets. - The first parameter is the value for each element of the new vector. In this case, we're setting every entry we create to be a
Floor(from theTileTypeenumeration). - The second parameter is how many tiles we should create. They will all be set to the value we set above. In this case, our map is 80x50 tiles (4,000 tiles - but we'll let the compiler do the math for us!). So we need to make 4,000 tiles.
- You could have replaced the
vec!call withfor _i in 0..4000 { map.push(TileType::Floor); }. In fact, that's pretty much what the macro did for you - but it's definitely less typing to have the macro do it for you!
for x in 0..80 {is afor loop(see here), just like we used in the previous example. In this case, we're iteratingxfrom 0 to 79.map[xy_idx(x, 0)] = TileType::Wall;first calls thexy_idxfunction we defined above to get the vector index forx, 0. It then indexes the vector, telling it to set the vector entry at that position to be a wall. We do this again forx,49.- We do the same thing, but looping
yfrom 0..49 - and setting the vertical walls on our map. let mut rng = rltk::RandomNumberGenerator::new();calls theRandomNumberGeneratortype inRLTK'snewfunction, and assigns it to a variable calledrng. We are asking RLTK to give us a new dice roller.for _i in 0..400 {is the same as otherforloops, but notice the_beforei. We aren't actually looking at the value ofi- we just want the loop to run 400 times. Rust will give you a warning if you have a variable you don't use; adding the underscore prefix tells Rust that it's ok, we meant to do that.let x = rng.roll_dice(1, 79);calls therngwe grabbed in 7, and asks it for a random number from 1 to 79. RLTK does not go with an exclusive range, because it is trying to mirror the old D&D convention of dice being1d20or similar. In this case, we should be glad that computers don't care about the geometric difficulty of inventing a 79-sided dice! We also obtain ayvalue between 1 and 49. We've rolled imaginary dice, and found a random location on the map.- We set the variable
idx(short for "index") to the vector index (viaxy_idxwe defined earlier) for the coordinates we rolled. if idx != xy_idx(40, 25) {checks thatidxisn't the exact middle (we'll be starting there, so we don't want to start inside a wall!).- If it isn't the middle, we set the randomly rolled location to be a wall.
It's pretty simple: it places walls around the outer edges of the map, and then adds 400 random walls anywhere that isn't the player's starting point.
Making the map visible to the world
Specs includes a concept of "resources" - shared data the whole ECS can use. So in our main function, we add a randomly generated map to the world:
#![allow(unused)]
fn main() {
gs.ecs.insert(new_map());
}
The map is now available from anywhere the ECS can see! Now inside your code, you can access the map with the rather unwieldy let map = self.ecs.get_mut::<Vec<TileType>>();; it's available to systems in an easier fashion. There's actually several ways to get the value of map, including ecs.get, ecs.fetch. get_mut obtains a "mutable" (you can change it) reference to the map - wrapped in an optional (in case the map isn't there). fetch skips the Option type and gives you a map directly. You can learn more about this in the Specs Book.
Draw the map
Now that we have a map available, we should put it on the screen! The complete code for the new draw_map function looks like this:
#![allow(unused)]
fn main() {
fn draw_map(map: &[TileType], ctx : &mut Rltk) {
    let mut y = 0;
    let mut x = 0;
    for tile in map.iter() {
        // Render a tile depending upon the tile type
        match tile {
            TileType::Floor => {
                ctx.set(x, y, RGB::from_f32(0.5, 0.5, 0.5), RGB::from_f32(0., 0., 0.), rltk::to_cp437('.'));
            }
            TileType::Wall => {
                ctx.set(x, y, RGB::from_f32(0.0, 1.0, 0.0), RGB::from_f32(0., 0., 0.), rltk::to_cp437('#'));
            }
        }

        // Move the coordinates
        x += 1;
        if x > 79 {
            x = 0;
            y += 1;
        }
    }
}
}
This is mostly straightforward, and uses concepts we've already visited. In the declaration, we pass the map as &[TileType] rather than &Vec<TileType>; this allows us to pass in "slices" (parts of) a map if we so choose. We won't do that yet, but it may be useful later. It's also considered a more "rustic" (that is: idiomatic Rust) way to do things, and the linter (clippy) warns about it. The Rust Book can teach you about slices, if you are interested.
Otherwise, it takes advantage of the way we are storing our map - rows together, one after the other. So it iterates through the entire map structure, adding 1 to the x position for each tile. If it hits the map width, it zeroes x and adds one to y. This way we aren't repeatedly reading all over the array - which can get slow. The actual rendering is very simple: we match the tile type, and draw either a period or a hash for walls/floors.
We should also call the function! In our tick function, add:
#![allow(unused)]
fn main() {
let map = self.ecs.fetch::<Vec<TileType>>();
draw_map(&map, ctx);
}
The fetch call is new (we mentioned it above). fetch requires that you promise that you know that the resource you are requesting really does exist - and will crash if it doesn't. It doesn't quite return a reference - it's a shred type, which acts like a reference most of the time but occasionally needs a bit of coercing to be one. We'll worry about that bridge when it comes time to cross it, but consider yourself warned!
Making walls solid
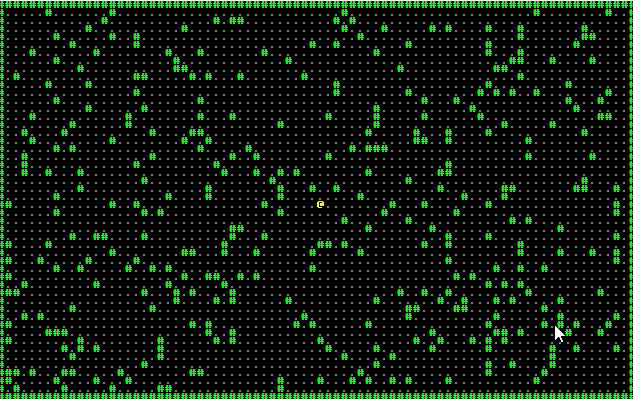
So now if you run the program (cargo run), you'll have a green and grey map with a yellow @ who can move around. Unfortunately, you'll quickly notice that the player can walk through walls! Fortunately, that's pretty easy to rectify.
To accomplish this, we modify the try_move_player to read the map and check that the destination is open:
#![allow(unused)]
fn main() {
fn try_move_player(delta_x: i32, delta_y: i32, ecs: &mut World) {
    let mut positions = ecs.write_storage::<Position>();
    let mut players = ecs.write_storage::<Player>();
    let map = ecs.fetch::<Vec<TileType>>();

    for (_player, pos) in (&mut players, &mut positions).join() {
        let destination_idx = xy_idx(pos.x + delta_x, pos.y + delta_y);
        if map[destination_idx] != TileType::Wall {
            pos.x = min(79 , max(0, pos.x + delta_x));
            pos.y = min(49, max(0, pos.y + delta_y));
        }
    }
}
}
The new parts are the let map = ... part, which uses fetch just the same way as the main loop (this is the advantage of storing it in the ECS - you can get to it everywhere without trying to coerce Rust into letting you use global variables!). We calculate the cell index of the player's destination with let destination_idx = xy_idx(pos.x + delta_x, pos.y + delta_y); - and if it isn't a wall, we move as normal.
Run the program (cargo run) now, and you have a player in a map - and can move around, properly obstructed by walls.
The full program now looks like this:
use rltk::{GameState, Rltk, RGB, VirtualKeyCode};
use specs::prelude::*;
use std::cmp::{max, min};
use specs_derive::*;


#[derive(Component)]
struct Position {
    x: i32,
    y: i32,
}

#[derive(Component)]
struct Renderable {
    glyph: rltk::FontCharType,
    fg: RGB,
    bg: RGB,
}

#[derive(Component, Debug)]
struct Player {}

#[derive(PartialEq, Copy, Clone)]
enum TileType {
    Wall, Floor
}

struct State {
    ecs: World
}

pub fn xy_idx(x: i32, y: i32) -> usize {
    (y as usize * 80) + x as usize
}

fn new_map() -> Vec<TileType> {
    let mut map = vec![TileType::Floor; 80*50];

    // Make the boundaries walls
    for x in 0..80 {
        map[xy_idx(x, 0)] = TileType::Wall;
        map[xy_idx(x, 49)] = TileType::Wall;
    }
    for y in 0..50 {
        map[xy_idx(0, y)] = TileType::Wall;
        map[xy_idx(79, y)] = TileType::Wall;
    }

    // Now we'll randomly splat a bunch of walls. It won't be pretty, but it's a decent illustration.
    // First, obtain the thread-local RNG:
    let mut rng = rltk::RandomNumberGenerator::new();

    for _i in 0..400 {
        let x = rng.roll_dice(1, 79);
        let y = rng.roll_dice(1, 49);
        let idx = xy_idx(x, y);
        if idx != xy_idx(40, 25) {
            map[idx] = TileType::Wall;
        }
    }

    map
}

fn try_move_player(delta_x: i32, delta_y: i32, ecs: &mut World) {
    let mut positions = ecs.write_storage::<Position>();
    let mut players = ecs.write_storage::<Player>();
    let map = ecs.fetch::<Vec<TileType>>();

    for (_player, pos) in (&mut players, &mut positions).join() {
        let destination_idx = xy_idx(pos.x + delta_x, pos.y + delta_y);
        if map[destination_idx] != TileType::Wall {
            pos.x = min(79 , max(0, pos.x + delta_x));
            pos.y = min(49, max(0, pos.y + delta_y));
        }
    }
}

fn player_input(gs: &mut State, ctx: &mut Rltk) {
    // Player movement
    match ctx.key {
        None => {} // Nothing happened
        Some(key) => match key {
            VirtualKeyCode::Left => try_move_player(-1, 0, &mut gs.ecs),
            VirtualKeyCode::Right => try_move_player(1, 0, &mut gs.ecs),
            VirtualKeyCode::Up => try_move_player(0, -1, &mut gs.ecs),
            VirtualKeyCode::Down => try_move_player(0, 1, &mut gs.ecs),
            _ => {}
        },
    }
}

fn draw_map(map: &[TileType], ctx : &mut Rltk) {
    let mut y = 0;
    let mut x = 0;
    for tile in map.iter() {
        // Render a tile depending upon the tile type
        match tile {
            TileType::Floor => {
                ctx.set(x, y, RGB::from_f32(0.5, 0.5, 0.5), RGB::from_f32(0., 0., 0.), rltk::to_cp437('.'));
            }
            TileType::Wall => {
                ctx.set(x, y, RGB::from_f32(0.0, 1.0, 0.0), RGB::from_f32(0., 0., 0.), rltk::to_cp437('#'));
            }
        }

        // Move the coordinates
        x += 1;
        if x > 79 {
            x = 0;
            y += 1;
        }
    }
}

impl GameState for State {
    fn tick(&mut self, ctx : &mut Rltk) {
        ctx.cls();

        player_input(self, ctx);
        self.run_systems();

        let map = self.ecs.fetch::<Vec<TileType>>();
        draw_map(&map, ctx);

        let positions = self.ecs.read_storage::<Position>();
        let renderables = self.ecs.read_storage::<Renderable>();

        for (pos, render) in (&positions, &renderables).join() {
            ctx.set(pos.x, pos.y, render.fg, render.bg, render.glyph);
        }
    }
}

impl State {
    fn run_systems(&mut self) {
        self.ecs.maintain();
    }
}

fn main() -> rltk::BError {
    use rltk::RltkBuilder;
    let context = RltkBuilder::simple80x50()
        .with_title("Roguelike Tutorial")
        .build()?;
    let mut gs = State {
        ecs: World::new()
    };
    gs.ecs.register::<Position>();
    gs.ecs.register::<Renderable>();
    gs.ecs.register::<Player>();

    gs.ecs.insert(new_map());

    gs.ecs
        .create_entity()
        .with(Position { x: 40, y: 25 })
        .with(Renderable {
            glyph: rltk::to_cp437('@'),
            fg: RGB::named(rltk::YELLOW),
            bg: RGB::named(rltk::BLACK),
        })
        .with(Player{})
        .build();

    rltk::main_loop(context, gs)
}
The source code for this chapter may be found here
Run this chapter's example with web assembly, in your browser (WebGL2 required)
Copyright (C) 2019, Herbert Wolverson.