Chapter 2 - Entities and Components
About this tutorial
This tutorial is free and open source, and all code uses the MIT license - so you are free to do with it as you like. My hope is that you will enjoy the tutorial, and make great games!
If you enjoy this and would like me to keep writing, please consider supporting my Patreon.
This chapter will introduce the entire of an Entity Component System (ECS), which will form the backbone of the rest of this tutorial. Rust has a very good ECS, called Specs - and this tutorial will show you how to use it, and try to demonstrate some of the early benefits of using it.
About Entities and Components
If you've worked on games before, you may well be used to an object oriented design (this is very common, even in the original Python libtcod tutorial that inspired this one). There's nothing really wrong with an object-oriented (OOP) design - but game developers have moved away from it, mostly because it can become quite confusing when you start to expand your game beyond your original design ideas.
You've probably seen a "class hierarchy" such as this simplified one:
BaseEntity
    Monster
        MeleeMob
            OrcWarrior
        ArcherMob
            OrcArcher
You'd probably have something more complicated than that, but it works as an illustration. BaseEntity would contain code/data required to appear on the map as an entity, Monster indicates that it's a bad guy, MeleeMob would hold the logic for finding melee targets, closing in, and killing them. Likewise, ArcherMob would try to maintain the optimal range and use their ranged weapon to fire from a safe distance. The problem with a taxonomy like this is that it can be restrictive, and before you know it - you are starting to write separate classes for more complicated combinations. For example, what if we come up with an orc that can do both melee and archery - and may become friendly if you've completed the Friends With The Greenskins quest? You might well end up combining logic from all of them into one special case class. It works - and plenty of games have published doing just that - but what if there were an easier way?
Entity Component based design tries to eliminate the hierarchy, and instead implement a set of "components" that describe what you want. An "entity" is a thing - anything, really. An orc, a wolf, a potion, an Ethereal hard-drive formatting ghost - whatever you want. It's also really simple: little more than an identification number. The magic comes from entities being able to have as many components as you want to add. Components are just data, grouped by whatever properties you want to give an entity.
For example, you could build the same set of mobs with components for: Position, Renderable, Hostile, MeleeAI, RangedAI, and some sort of CombatStats component (to tell you about their weaponry, hit points, etc.). An Orc Warrior would need a position so you know where they are, a renderable so you know how to draw them. It's Hostile, so you mark it as such. Give it a MeleeAI and a set of game stats, and you have everything you need to make it approach the player and try to hit them. An Archer might be the same thing, but replacing MeleeAI with RangedAI. A hybrid could keep all the components, but either have both AIs or an additional one if you want custom behavior. If your orc becomes friendly, you could remove the Hostile component - and add a Friendly one.
In other words: components are just like your inheritance tree, but instead of inheriting traits you compose them by adding components until it does what you want. This is often called "composition".
The "S" in ECS stands for "Systems". A System is a piece of code that gathers data from the entity/components list and does something with it. It's actually quite similar to an inheritance model, but in some ways it's "backwards". For example, drawing in an OOP system is often: For each BaseEntity, call that entity's Draw command. In an ECS system, it would be Get all entities with a position and a renderable component, and use that data to draw them.
For small games, an ECS often feels like it's adding a bit of extra typing to your code. It is. You take the additional work up front, to make life easier later.
That's a lot to digest, so we'll look at a simple example of how an ECS can make your life a bit easier.
It's important to know that ECS is just one way of handling composition. There are many others, and there really is no right answer. With a bit of searching, you can find a bunch of different ways to approach ECS. There's plenty of object-oriented approaches. There are plenty of "free function" approaches. They all have merit, and can work for you. I've gone with the Entity-Component approach in this book, but there are many other ways to skin the cat. As you gain experience, you'll find one that's comfortable for you! My advice: if anyone tells you that a particular method is the "right" one, ignore them - programming is the art of making something that works, rather than a quest for purity!
Including Specs in the project
To start, we want to tell Cargo that we're going to use Specs. Open your Cargo.toml file, and change the dependencies section to look like this:
[dependencies]
rltk = { version = "0.8.0" }
specs = "0.16.1"
specs-derive = "0.4.1"
This is pretty straightforward: we're telling Rust that we still want to use RLTK, and we're also asking for specs (the version number is current at the time of writing; you can check for new ones by typing cargo search specs). We're also adding specs-derive - which provides some helper code to reduce the amount of boilerplate typing you have to do.
At the top of main.rs we add a few lines of code:
#![allow(unused)]
fn main() {
use rltk::{GameState, Rltk, RGB, VirtualKeyCode};
use specs::prelude::*;
use std::cmp::{max, min};
use specs_derive::Component;
}
use rltk:: is shorthand; you can type rltk::Console every time you want a console; this tells Rust that we'd like to just type Console instead. Likewise the use specs::prelude::* line is there so we aren't continually typing specs::prelude::World when we just want World.
Old Rust required a scary looking
macro_usecall. You don't need that anymore: you can just directly use the macro.
We need the derivations from Specs' derive component: so we add use specs_derive::Component;.
Defining a position component
We're going to build a little demo that uses an ECS to put characters on the screen and move them around. A basic part of this is to define a position - so that entities know where they are. We'll keep it simple: positions are just an X and Y coordinate on the screen.
So, we define a struct (these are like structs in C, records in Pascal, etc. - a group of data stored together. See the Rust Book chapter on Structures):
#![allow(unused)]
fn main() {
struct Position {
    x: i32,
    y: i32,
}
}
Very simple! A Position component has an x and y coordinate, as 32-bit integers. Our Position structure is what is known as a POD - short for "plain old data". That is, it is just data, and doesn't have any logic of its own. This is a common theme with "pure" ECS (Entity Component System) components: they are just data, with no associated logic. The logic will be implemented elsewhere. There are two reasons to use this model: it keeps all of your code that does something in "systems" (that is, code that runs across components and entities), and performance - it's very fast to keep all of the positions next to each other in memory with no redirects.
At this point, you could use Positions, but there's very little to help you store them or assign them to anyone - so we need to tell Specs that this is a component. Specs provides a lot of options for this, but we want to keep it simple. The long-form (no specs-derive help) would look like this:
#![allow(unused)]
fn main() {
struct Position {
    x: i32,
    y: i32,
}

impl Component for Position {
    type Storage = VecStorage<Self>;
}
}
You will probably have a lot of components by the time your game is done - so that's a lot of typing. Not only that, but it's lots of typing the same thing over and over - with the potential to get confusing. Fortunately, specs-derive provides an easier way. You can replace the previous code with:
#![allow(unused)]
fn main() {
#[derive(Component)]
struct Position {
    x: i32,
    y: i32,
}
}
What does this do? #[derive(x)] is a macro that says "from my basic data, please derive the boilerplate needed for x"; in this case, the x is a Component. The macro generates the additional code for you, so you don't have to type it in for every component. It makes it nice and easy to use components! The #[macro_use] use specs_derive::Component; from earlier is making use of this; derive macros are a special type of macro that implements additional functionality for a structure on your behalf - saving lots of typing.
Defining a renderable component
A second part of putting a character on the screen is what character should we draw, and in what color? To handle this, we'll create a second component - Renderable. It will contain a foreground, background, and glyph (such as @) to render. So we'll create a second component structure:
#![allow(unused)]
fn main() {
#[derive(Component)]
struct Renderable {
    glyph: rltk::FontCharType,
    fg: RGB,
    bg: RGB,
}
}
RGB comes from RLTK, and represents a color. That's why we have the use rltk::{... RGB} statement - otherwise, we'd be typing rltk::RGB every time there - saving keystrokes. Once again, this is a plain old data structure, and we are using the derive macro to add the component storage information without having to type it all out.
Worlds and Registration
So now we have two component types, but that's not very useful without somewhere to put them! Specs requires that you register your components at start-up. What do you register it with? A World!
A World is an ECS, provided by the Rust crate Specs. You can have more than one if you want, but we won't go there yet. We'll extend our State structure to have a place to store the world:
#![allow(unused)]
fn main() {
struct State {
    ecs: World
}
}
And now in main, when we create the world - we'll put an ECS into it:
#![allow(unused)]
fn main() {
let mut gs = State {
    ecs: World::new()
};
}
Notice that World::new() is another constructor - it's a method inside the World type, but without a reference to self. So it doesn't work on existing World objects - it can only make new ones. This is a pattern used everywhere in Rust, so it's a good idea to be familiar with it. The Rust Book has a section on the topic.
The next thing to do is to tell the ECS about the components we have created. We do this right after we create the world:
#![allow(unused)]
fn main() {
gs.ecs.register::<Position>();
gs.ecs.register::<Renderable>();
}
What this does is it tells our World to take a look at the types we are giving it, and do some internal magic to create storage systems for each of them. Specs has made this easy; so long as it implements Component, you can put anything you like in as a component!
Creating entities
Now we've got a World that knows how to store Position and Renderable components. Having these components simply exist doesn't help us, beyond providing an indication of structure. In order to use them, they need to be attached to something in the game. In the ECS world, that something is called an entity. Entities are quite simple; they are little more than an identification number, telling the ECS that an entity exists. They can have any combination of components attached to them. In this case, we're going to make an entity that knows where it is on the screen, and knows how it should be represented on the screen.
We can create an entity with both a Renderable and a Position component like this:
#![allow(unused)]
fn main() {
gs.ecs
    .create_entity()
    .with(Position { x: 40, y: 25 })
    .with(Renderable {
        glyph: rltk::to_cp437('@'),
        fg: RGB::named(rltk::YELLOW),
        bg: RGB::named(rltk::BLACK),
    })
    .build();
}
What this does, is it tells our World (ecs in gs - our game state) that we'd like a new entity. That entity should have a position (we've picked the middle of the console), and we'd like it to be renderable with an @ symbol in yellow on black. That's very simple; we aren't even storing the entity (we could if we wanted to) - we're just telling the world that it's there!
Notice that we are using an interesting layout: lots of functions that don't end in an ; to separate out the end of the statement, but instead lots of . calls to another function. This is called the builder pattern, and is very common in Rust. Combining functions in this fashion is called method chaining (a method is a function inside a structure). It works because each function returns a copy of itself - so each function runs in turn, passing itself as the holder for the next method in the chain. So in this example, we start with a create_entity call - which returns a new, empty, entity. On that entity, we call with - which attaches a component to it. That in turn returns the partially built entity - so we can call with again to add the Renderable component. Finally, .build() takes the assembled entity and does the hard part - actually putting together all of the disparate parts into the right parts of the ECS for you.
You could easily add a bunch more entities, if you want. Lets do just that:
#![allow(unused)]
fn main() {
for i in 0..10 {
    gs.ecs
    .create_entity()
    .with(Position { x: i * 7, y: 20 })
    .with(Renderable {
        glyph: rltk::to_cp437('☺'),
        fg: RGB::named(rltk::RED),
        bg: RGB::named(rltk::BLACK),
    })
    .build();
}
}
This is the first time we've called a for loop in the tutorial! If you've used other programming languages, the concept will be familiar: run the loop with i set to every value from 0 to 9. Wait - 9, you say? Rust ranges are exclusive - they don't include the very last number in the range! This is for familiarity with languages like C which normally write for (i=0; i<10; ++i). If you actually want to go all the way to the end of the range (so 0 to 10), you would write the rather cryptic for i in 0..=10. The Rust Book provides a great primer for understanding control flow in Rust.
You'll notice that we're putting them at different positions (every 7 characters, 10 times), and we've changed the @ to an ☺ - a smiley face (to_cp437 is a helper RLTK provides to let you type/paste Unicode and get the equivalent member of the old DOS/CP437 character set. You could replace the to_cp437('☺') with a 1 for the same thing). You can find the glyphs available here.
Iterating entities - a generic render system
So we now have 11 entities, with differing render characteristics and positions. It would be a great idea to do something with that data! In our tick function, we replace the call to draw "Hello Rust" with the following:
#![allow(unused)]
fn main() {
let positions = self.ecs.read_storage::<Position>();
let renderables = self.ecs.read_storage::<Renderable>();

for (pos, render) in (&positions, &renderables).join() {
    ctx.set(pos.x, pos.y, render.fg, render.bg, render.glyph);
}
}
What does this do? let positions = self.ecs.read_storage::<Position>(); asks the ECS for read access to the container it is using to store Position components. Likewise, we ask for read access to the Renderable storage. It only makes sense to draw a character if it has both of these - you need a Position to know where to draw, and Renderable to know what to draw! You can learn more about these stores in The Specs Book. The important part is read_storage - we're asking for read-only access to the structure used to store components of each type.
Fortunately, Specs has our back:
#![allow(unused)]
fn main() {
for (pos, render) in (&positions, &renderables).join() {
}
This line says join positions and renderables; like a database join, it only returns entities that have both. It then uses Rust's "destructuring" to place each result (one result per entity that has both components). So for each iteration of the for loop - you get both components belonging to the same entity. That's enough to draw it!
The join function returns an iterator. The Rust Book has a great section on iterators. In C++, iterators provide a begin, next and end function - and you can move between elements in collections with them. Rust extends the same concept, only on steroids: just about anything can be made into an iterator if you put your mind to it. Iterators work very well with for loops - you can provide any iterator as the target in for x in iterator loops. The 0..10 we discussed earlier really is a range - and offers an iterator for Rust to navigate.
The other interesting thing here are the parentheses. In Rust, when you wrap variables in brackets you are making a tuple. These are just a collection of variables, grouped together - but without needing to go and make a structure just for this case. You can access them individually via numeric access (mytuple.0, mytuple.1, etc.) to get to each field, or you can destructure them. (one, two) = (1, 2) sets the variable one to 1, and the variable two to 2. That's what we're doing here: the join iterator is returning tuples containing a Position and a Renderable component as .0 and .1. Since typing that is ugly and unclear, we destructure them into the named variables pos and render. This can be confusing at first, so if you are struggling I recommend Rust By Example's section on Tuples.
#![allow(unused)]
fn main() {
ctx.set(pos.x, pos.y, render.fg, render.bg, render.glyph);
}
We're running this for every entity that has both a Position and a Renderable component. The join method is passing us both, guaranteed to belong to the same enitity. Any entities that have one or the other - but not both - simply won't be included in the data returned to us.
ctx is the instance of RLTK passed to us when tick runs. It offers a function called set, that sets a single terminal character to the glyph/colors of your choice. So we pass it the data from pos (the Position component for that entity), and the colors/glyph from render (the Renderable component for that entity).
With that in place, any entity that has both a Position and a Renderable will be rendered to the screen! You could add as many as you like, and they will render. Remove one component or the other, and they won't be rendered (for example, if an item is picked up you might remove its Position component - and add another indicating that it's in your backpack; more on that in later tutorials)
Rendering - complete code
If you've typed all of that in correctly, your main.rs now looks like this:
use rltk::{GameState, Rltk, RGB};
use specs::prelude::*;
use std::cmp::{max, min};
use specs_derive::Component;

#[derive(Component)]
struct Position {
    x: i32,
    y: i32,
}

#[derive(Component)]
struct Renderable {
    glyph: rltk::FontCharType,
    fg: RGB,
    bg: RGB,
}

struct State {
    ecs: World
}

impl GameState for State {
    fn tick(&mut self, ctx : &mut Rltk) {
        ctx.cls();
        let positions = self.ecs.read_storage::<Position>();
        let renderables = self.ecs.read_storage::<Renderable>();

        for (pos, render) in (&positions, &renderables).join() {
            ctx.set(pos.x, pos.y, render.fg, render.bg, render.glyph);
        }
    }
}

fn main() -> rltk::BError {
    use rltk::RltkBuilder;
    let context = RltkBuilder::simple80x50()
        .with_title("Roguelike Tutorial")
        .build()?;
    let mut gs = State {
        ecs: World::new()
    };
    gs.ecs.register::<Position>();
    gs.ecs.register::<Renderable>();

    gs.ecs
        .create_entity()
        .with(Position { x: 40, y: 25 })
        .with(Renderable {
            glyph: rltk::to_cp437('@'),
            fg: RGB::named(rltk::YELLOW),
            bg: RGB::named(rltk::BLACK),
        })
        .build();

    for i in 0..10 {
        gs.ecs
        .create_entity()
        .with(Position { x: i * 7, y: 20 })
        .with(Renderable {
            glyph: rltk::to_cp437('☺'),
            fg: RGB::named(rltk::RED),
            bg: RGB::named(rltk::BLACK),
        })
        .build();
    }

    rltk::main_loop(context, gs)
}
Running it (with cargo run) will give you the following:
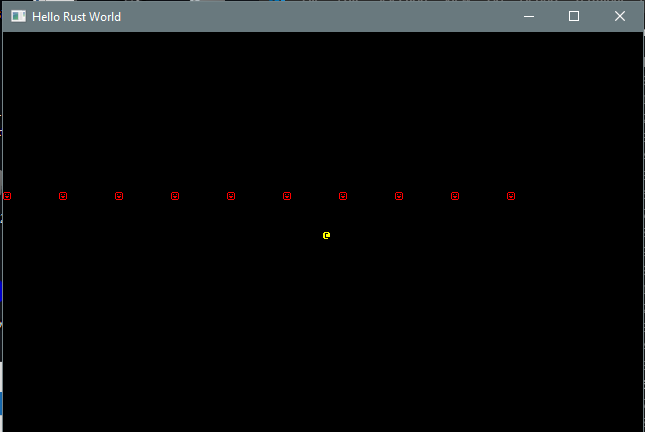
An example system - random movement
This example showed you how an ECS can get a disparate bag of entities to render. Go ahead and play around with the entity creation - you can do a lot with this! Unfortunately, it's pretty boring - nothing is moving! Lets rectify that a bit, and make a shooting gallery type look.
First, we'll create a new component called LeftMover. Entities that have this component are indicating that they really like going to the left. The component definition is very simple; a component with no data like this is called a "tag component". We'll put it up with our other component definitions:
#![allow(unused)]
fn main() {
#[derive(Component)]
struct LeftMover {}
}
Now we have to tell the ECS to use the type. With our other register calls, we add:
#![allow(unused)]
fn main() {
gs.ecs.register::<LeftMover>();
}
Now, lets only make the red smiley faces left movers. So their definition grows to:
#![allow(unused)]
fn main() {
for i in 0..10 {
    gs.ecs
    .create_entity()
    .with(Position { x: i * 7, y: 20 })
    .with(Renderable {
        glyph: rltk::to_cp437('☺'),
        fg: RGB::named(rltk::RED),
        bg: RGB::named(rltk::BLACK),
    })
    .with(LeftMover{})
    .build();
}
}
Notice how we've added one line: .with(LeftMover{}) - that's all it takes to add one more component to these entities (and not the yellow @).
Now to actually make them move. We're going to define our first system. Systems are a way to contain entity/component logic together, and have them run independently. There's lots of complex flexibility available, but we're going to keep it simple. Here's everything required for our LeftWalker system:
#![allow(unused)]
fn main() {
struct LeftWalker {}

impl<'a> System<'a> for LeftWalker {
    type SystemData = (ReadStorage<'a, LeftMover>,
                        WriteStorage<'a, Position>);

    fn run(&mut self, (lefty, mut pos) : Self::SystemData) {
        for (_lefty,pos) in (&lefty, &mut pos).join() {
            pos.x -= 1;
            if pos.x < 0 { pos.x = 79; }
        }
    }
}
}
This isn't as nice/simple as I'd like, but it does make sense when you understand it. Lets go through it a piece at a time:
struct LeftWalker {}just defines an empty structure - somewhere to attach the logic.impl<'a> System<'a> for LeftWalkermeans we are implementing Specs'Systemtrait for ourLeftWalkerstructure. The'aare lifetime specifiers: the system is saying that the components it uses must exist long enough for the system to run. For now, it's not worth worrying too much about it. If you are interested, the Rust Book can clarify a bit.type SystemDatais defining a type to tell Specs what the system requires. In this case, read access toLeftMovercomponents, and write access (since it updates them) toPositioncomponents. You can mix and match whatever you need in here, as we'll see in later chapters.fn runis the actual trait implementation, required by theimpl System. It takes itself, and theSystemDatawe defined.- The for loop is system shorthand for the same iteration we did in the rendering system: it will run once for each entity that has both a
LeftMoverand aPosition. Note that we're putting an underscore before theLeftMovervariable name: we never actually use it, we just require that the entity has one. The underscore tells Rust "we know we aren't using it, this isn't a bug!" and stops it from warning us every time we compile. - The meat of the loop is very simple: we subtract one from the position component, and if it is less than zero we scoot back to the right of the screen.
Notice that this is very similar to how we wrote the rendering code - but instead of calling in to the ECS, the ECS system is calling into our function/system. It can be a tough judgment call on which to use. If your system just needs data from the ECS, then a system is the right place to put it. If it also needs access to other parts of your program, it is probably better implemented on the outside - calling in.
Now that we've written our system, we need to be able to use it. We'll add a run_systems function to our State:
#![allow(unused)]
fn main() {
impl State {
    fn run_systems(&mut self) {
        let mut lw = LeftWalker{};
        lw.run_now(&self.ecs);
        self.ecs.maintain();
    }
}
}
This is relatively straightforward:
impl Statemeans we would like to implement functionality forState.fn run_systems(&mut self)means we are defining a function, and it needs mutable (i.e. it is allowed to change things) access to self; this means it can access the data in its instance ofStatewith theself.keyword.let mut lw = LeftWalker{}makes a new (changeable) instance of theLeftWalkersystem.lw.run_now(&self.ecs)tells the system to run, and tells it how to find the ECS.self.ecs.maintain()tells Specs that if any changes were queued up by the systems, they should apply to the world now.
Finally, we actually want to run our systems. In the tick function, we add:
#![allow(unused)]
fn main() {
self.run_systems();
}
The nice thing is that this will run all systems we register into our dispatcher; so as we add more, we don't have to worry about calling them (or even calling them in the right order). You still sometimes need more access than the dispatcher has; our renderer isn't a system because it needs the Context from RLTK (we'll improve that in a future chapter).
So your code now looks like this:
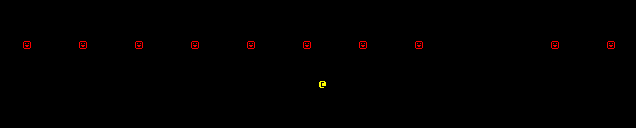
use rltk::{GameState, Rltk, RGB};
use specs::prelude::*;
use std::cmp::{max, min};
use specs_derive::Component;

#[derive(Component)]
struct Position {
    x: i32,
    y: i32,
}

#[derive(Component)]
struct Renderable {
    glyph: rltk::FontCharType,
    fg: RGB,
    bg: RGB,
}

#[derive(Component)]
struct LeftMover {}

struct State {
    ecs: World,
}

impl GameState for State {
    fn tick(&mut self, ctx : &mut Rltk) {
        ctx.cls();

        self.run_systems();

        let positions = self.ecs.read_storage::<Position>();
        let renderables = self.ecs.read_storage::<Renderable>();

        for (pos, render) in (&positions, &renderables).join() {
            ctx.set(pos.x, pos.y, render.fg, render.bg, render.glyph);
        }
    }
}

struct LeftWalker {}

impl<'a> System<'a> for LeftWalker {
    type SystemData = (ReadStorage<'a, LeftMover>,
                        WriteStorage<'a, Position>);

    fn run(&mut self, (lefty, mut pos) : Self::SystemData) {
        for (_lefty,pos) in (&lefty, &mut pos).join() {
            pos.x -= 1;
            if pos.x < 0 { pos.x = 79; }
        }
    }
}

impl State {
    fn run_systems(&mut self) {
        let mut lw = LeftWalker{};
        lw.run_now(&self.ecs);
        self.ecs.maintain();
    }
}

fn main() -> rltk::BError {
    use rltk::RltkBuilder;
    let context = RltkBuilder::simple80x50()
        .with_title("Roguelike Tutorial")
        .build()?;
    let mut gs = State {
        ecs: World::new()
    };
    gs.ecs.register::<Position>();
    gs.ecs.register::<Renderable>();
    gs.ecs.register::<LeftMover>();

    gs.ecs
        .create_entity()
        .with(Position { x: 40, y: 25 })
        .with(Renderable {
            glyph: rltk::to_cp437('@'),
            fg: RGB::named(rltk::YELLOW),
            bg: RGB::named(rltk::BLACK),
        })
        .build();

    for i in 0..10 {
        gs.ecs
        .create_entity()
        .with(Position { x: i * 7, y: 20 })
        .with(Renderable {
            glyph: rltk::to_cp437('☺'),
            fg: RGB::named(rltk::RED),
            bg: RGB::named(rltk::BLACK),
        })
        .with(LeftMover{})
        .build();
    }

    rltk::main_loop(context, gs)
}
If you run it (with cargo run), the red smiley faces zoom to the left, while the @ watches.
Moving the player
Finally, lets make the @ move with keyboard controls. So we know which entity is the player, we'll make a new tag component:
#![allow(unused)]
fn main() {
#[derive(Component, Debug)]
struct Player {}
}
We'll add it to registration:
#![allow(unused)]
fn main() {
gs.ecs.register::<Player>();
}
And we'll add it to the player's entity:
#![allow(unused)]
fn main() {
gs.ecs
    .create_entity()
    .with(Position { x: 40, y: 25 })
    .with(Renderable {
        glyph: rltk::to_cp437('@'),
        fg: RGB::named(rltk::YELLOW),
        bg: RGB::named(rltk::BLACK),
    })
    .with(Player{})
    .build();
}
Now we implement a new function, try_move_player:
#![allow(unused)]
fn main() {
fn try_move_player(delta_x: i32, delta_y: i32, ecs: &mut World) {
    let mut positions = ecs.write_storage::<Position>();
    let mut players = ecs.write_storage::<Player>();

    for (_player, pos) in (&mut players, &mut positions).join() {
        pos.x = min(79 , max(0, pos.x + delta_x));
        pos.y = min(49, max(0, pos.y + delta_y));
    }
}
}
Drawing on our previous experience, we can see that this gains write access to Player and Position. It then joins the two, ensuring that it will only work on entities that have both component types - in this case, just the player. It then adds delta_x to x and delta_y to y - and does some checks to make sure that you haven't tried to leave the screen.
We'll add a second function to read the keyboard information provided by RLTK:
#![allow(unused)]
fn main() {
fn player_input(gs: &mut State, ctx: &mut Rltk) {
    // Player movement
    match ctx.key {
        None => {} // Nothing happened
        Some(key) => match key {
            VirtualKeyCode::Left => try_move_player(-1, 0, &mut gs.ecs),
            VirtualKeyCode::Right => try_move_player(1, 0, &mut gs.ecs),
            VirtualKeyCode::Up => try_move_player(0, -1, &mut gs.ecs),
            VirtualKeyCode::Down => try_move_player(0, 1, &mut gs.ecs),
            _ => {}
        },
    }
}
}
There's quite a bit of functionality here that we haven't seen before! The context is providing information about a key - but the user may or may not be pressing one! Rust provides a feature for this, called Option types. Option types have two possible value: None (no data), or Some(x) - indicating that there is data here, held inside.
The context provides a key variable. It is an enumeration - that is, a variable that can hold a value from a set of pre-defined values (in this case, keys on the keyboard). Rust enumerations are really powerful, and can actually hold values as well - but we won't use that yet.
So to get the data out of an Option, we need to unwrap it. There's a function called unwrap - but if you call it when there isn't any data, your program will crash! So we'll use Rust's match command to peek inside. Matching is one of Rust's strongest benefits, and I highly recommend the Rust book chapter on it, or the Rust by Example section if you prefer learning by examples.
So we call match ctx.key - and Rust expects us to provide a list of possibles matches. In the case of ctx.key, there are only two possible values: Some or None. The None => {} line says "match the case in which ctx.key has no data" - and runs an empty block. Some(key) is the other option; there is some data - and we'll ask Rust to give it to us as a variable named key (you can name it whatever you like).
We then match again, this time on the key. We have a line for each eventuality we want to handle: VirtualKeyCode::Left => try_move_player(-1, 0, &mut gs.ecs) says that if key equals VirtualKeyCode::Left (VirtualKeyCode is the name of the enumeration type), we should call our try_move_player function with (-1, 0). We repeat that for all four directions. The _ => {} is rather odd looking; _ means anything else. So we're telling Rust that any other key code can be ignored here. Rust is rather pedantic: if you don't specify every possible enumeration, it will give a compiler error! By including the default, we don't have to type every possible keystroke.
This function takes the current game state and context, looks at the key variable in the context, and calls the appropriate move command if the relevant movement key is pressed. Lastly, we add it into tick:
#![allow(unused)]
fn main() {
player_input(self, ctx);
}
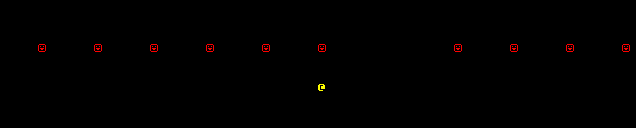
If you run your program (with cargo run), you now have a keyboard controlled @ symbol, while the smiley faces zoom to the left!
The final code for chapter 2
The source code for this completed example may be found ready-to-run in chapter-02-helloecs. It looks like this:
use rltk::{GameState, Rltk, RGB, VirtualKeyCode};
use specs::prelude::*;
use std::cmp::{max, min};
use specs_derive::Component;


#[derive(Component)]
struct Position {
    x: i32,
    y: i32,
}

#[derive(Component)]
struct Renderable {
    glyph: rltk::FontCharType,
    fg: RGB,
    bg: RGB,
}

#[derive(Component)]
struct LeftMover {}

#[derive(Component, Debug)]
struct Player {}

struct State {
    ecs: World
}

fn try_move_player(delta_x: i32, delta_y: i32, ecs: &mut World) {
    let mut positions = ecs.write_storage::<Position>();
    let mut players = ecs.write_storage::<Player>();

    for (_player, pos) in (&mut players, &mut positions).join() {
        pos.x = min(79 , max(0, pos.x + delta_x));
        pos.y = min(49, max(0, pos.y + delta_y));
    }
}

fn player_input(gs: &mut State, ctx: &mut Rltk) {
    // Player movement
    match ctx.key {
        None => {} // Nothing happened
        Some(key) => match key {
            VirtualKeyCode::Left => try_move_player(-1, 0, &mut gs.ecs),
            VirtualKeyCode::Right => try_move_player(1, 0, &mut gs.ecs),
            VirtualKeyCode::Up => try_move_player(0, -1, &mut gs.ecs),
            VirtualKeyCode::Down => try_move_player(0, 1, &mut gs.ecs),
            _ => {}
        },
    }
}

impl GameState for State {
    fn tick(&mut self, ctx : &mut Rltk) {
        ctx.cls();

        player_input(self, ctx);
        self.run_systems();

        let positions = self.ecs.read_storage::<Position>();
        let renderables = self.ecs.read_storage::<Renderable>();

        for (pos, render) in (&positions, &renderables).join() {
            ctx.set(pos.x, pos.y, render.fg, render.bg, render.glyph);
        }
    }
}

struct LeftWalker {}

impl<'a> System<'a> for LeftWalker {
    type SystemData = (ReadStorage<'a, LeftMover>,
                        WriteStorage<'a, Position>);

    fn run(&mut self, (lefty, mut pos) : Self::SystemData) {
        for (_lefty,pos) in (&lefty, &mut pos).join() {
            pos.x -= 1;
            if pos.x < 0 { pos.x = 79; }
        }
    }
}

impl State {
    fn run_systems(&mut self) {
        let mut lw = LeftWalker{};
        lw.run_now(&self.ecs);
        self.ecs.maintain();
    }
}

fn main() -> rltk::BError {
    use rltk::RltkBuilder;
    let context = RltkBuilder::simple80x50()
        .with_title("Roguelike Tutorial")
        .build()?;
    let mut gs = State {
        ecs: World::new()
    };
    gs.ecs.register::<Position>();
    gs.ecs.register::<Renderable>();
    gs.ecs.register::<LeftMover>();
    gs.ecs.register::<Player>();

    gs.ecs
        .create_entity()
        .with(Position { x: 40, y: 25 })
        .with(Renderable {
            glyph: rltk::to_cp437('@'),
            fg: RGB::named(rltk::YELLOW),
            bg: RGB::named(rltk::BLACK),
        })
        .with(Player{})
        .build();

    for i in 0..10 {
        gs.ecs
        .create_entity()
        .with(Position { x: i * 7, y: 20 })
        .with(Renderable {
            glyph: rltk::to_cp437('☺'),
            fg: RGB::named(rltk::RED),
            bg: RGB::named(rltk::BLACK),
        })
        .with(LeftMover{})
        .build();
    }

    rltk::main_loop(context, gs)
}
This chapter was a lot to digest, but provides a really solid base on which to build. The great part is: you've now got further than many aspiring developers! You have entities on the screen, and can move around with the keyboard.
The source code for this chapter may be found here
Run this chapter's example with web assembly, in your browser (WebGL2 required)
Copyright (C) 2019, Herbert Wolverson.