Bloodstains
About this tutorial
This tutorial is free and open source, and all code uses the MIT license - so you are free to do with it as you like. My hope is that you will enjoy the tutorial, and make great games!
If you enjoy this and would like me to keep writing, please consider supporting my Patreon.
Our character lives the life of a "murder-hobo", looting and slaying at will - so it only makes sense that the pristine dungeon will start to resemble a charnel house. It also gives us a bridge into a future chapter, in which we'll start to add some particle and visual effects (in ASCII/CP437) to the game.
Storing the blood
Tiles either have blood or they don't, so it makes sense to attach them to the map as a set. So at the top of map.rs, we'll include a new storage type - HashSet:
#![allow(unused)]
fn main() {
use std::collections::HashSet;
}
In the map definition, we'll include a HashSet of usize (to represent tile indices) types for blood:
#![allow(unused)]
fn main() {
#[derive(Default, Serialize, Deserialize, Clone)]
pub struct Map {
    pub tiles : Vec<TileType>,
    pub rooms : Vec<Rect>,
    pub width : i32,
    pub height : i32,
    pub revealed_tiles : Vec<bool>,
    pub visible_tiles : Vec<bool>,
    pub blocked : Vec<bool>,
    pub depth : i32,
    pub bloodstains : HashSet<usize>,

    #[serde(skip_serializing)]
    #[serde(skip_deserializing)]
    pub tile_content : Vec<Vec<Entity>>
}
}
And in the new map generator, we'll initialize it:
#![allow(unused)]
fn main() {
let mut map = Map{
    tiles : vec![TileType::Wall; MAPCOUNT],
    rooms : Vec::new(),
    width : MAPWIDTH as i32,
    height: MAPHEIGHT as i32,
    revealed_tiles : vec![false; MAPCOUNT],
    visible_tiles : vec![false; MAPCOUNT],
    blocked : vec![false; MAPCOUNT],
    tile_content : vec![Vec::new(); MAPCOUNT],
    depth: new_depth,
    bloodstains: HashSet::new()
};
}
Rendering the blood
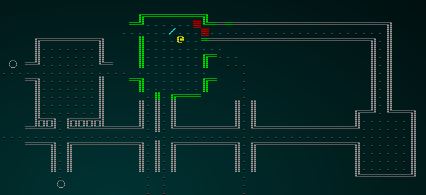
We'll indicate a bloodstain by changing a tile background to a dark red. We don't want to be too "in your face" with the effect, and we don't want to hide the tile content - so that should be sufficient. We'll also not show blood that isn't in visual range, to keep it understated. In map.rs, the render section now looks like this:
#![allow(unused)]
fn main() {
if map.revealed_tiles[idx] {
    let glyph;
    let mut fg;
    let mut bg = RGB::from_f32(0., 0., 0.);
    match tile {
        TileType::Floor => {
            glyph = rltk::to_cp437('.');
            fg = RGB::from_f32(0.0, 0.5, 0.5);
        }
        TileType::Wall => {
            glyph = wall_glyph(&*map, x, y);
            fg = RGB::from_f32(0., 1.0, 0.);
        }
        TileType::DownStairs => {
            glyph = rltk::to_cp437('>');
            fg = RGB::from_f32(0., 1.0, 1.0);
        }
    }
    if map.bloodstains.contains(&idx) { bg = RGB::from_f32(0.75, 0., 0.); }
    if !map.visible_tiles[idx] {
        fg = fg.to_greyscale();
        bg = RGB::from_f32(0., 0., 0.); // Don't show stains out of visual range
    }
    ctx.set(x, y, fg, bg, glyph);
}
}
Blood for the blood god
Now we need to add blood to the scene! We'll mark a tile as bloody whenever someone takes damage in it. We'll adjust the DamageSystem in damage_system.rs to set the bloodstain:
#![allow(unused)]
fn main() {
impl<'a> System<'a> for DamageSystem {
    type SystemData = ( WriteStorage<'a, CombatStats>,
                        WriteStorage<'a, SufferDamage>,
                        ReadStorage<'a, Position>,
                        WriteExpect<'a, Map>,
                        Entities<'a> );

    fn run(&mut self, data : Self::SystemData) {
        let (mut stats, mut damage, positions, mut map, entities) = data;

        for (entity, mut stats, damage) in (&entities, &mut stats, &damage).join() {
            stats.hp -= damage.amount.iter().sum::<i32>();
            let pos = positions.get(entity);
            if let Some(pos) = pos {
                let idx = map.xy_idx(pos.x, pos.y);
                map.bloodstains.insert(idx);
            }
        }

        damage.clear();
    }
}
}
If you cargo run your project, the map starts to show signs of battle!
The source code for this chapter may be found here
Run this chapter's example with web assembly, in your browser (WebGL2 required)
Copyright (C) 2019, Herbert Wolverson.