Nicer Walls
About this tutorial
This tutorial is free and open source, and all code uses the MIT license - so you are free to do with it as you like. My hope is that you will enjoy the tutorial, and make great games!
If you enjoy this and would like me to keep writing, please consider supporting my Patreon.
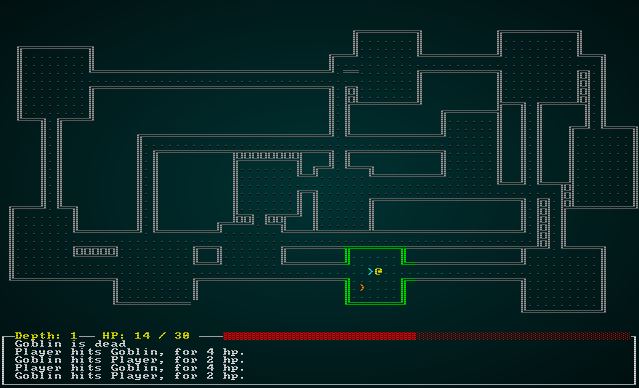
So far, we've used a very traditional rendering style for the map. Hash symbols for walls, periods for floors. It looks pretty nice, but games like Dwarf Fortress do a lovely job of using codepage 437's line-drawing characters to make the walls of the dungeon look smooth. This short chapter will show how to use a bitmask to calculate appropriate walls and render them appropriately. As usual, we'll start with our previous code from the end of Section 1.
Counting neighbors to build our bitset
We have a decent map rendering system in map.rs, specifically the function draw_map. If you find the section that matches tile by type, we can start by extending the Wall selection:
#![allow(unused)]
fn main() {
TileType::Wall => {
    glyph = wall_glyph(&*map, x, y);
    fg = RGB::from_f32(0., 1.0, 0.);
}
}
This requires the wall_glyph function, so lets write it:
#![allow(unused)]
fn main() {
fn wall_glyph(map : &Map, x: i32, y:i32) -> rltk::FontCharType {
    if x < 1 || x > map.width-2 || y < 1 || y > map.height-2 as i32 { return 35; }
    let mut mask : u8 = 0;

    if is_revealed_and_wall(map, x, y - 1) { mask +=1; }
    if is_revealed_and_wall(map, x, y + 1) { mask +=2; }
    if is_revealed_and_wall(map, x - 1, y) { mask +=4; }
    if is_revealed_and_wall(map, x + 1, y) { mask +=8; }

    match mask {
        0 => { 9 } // Pillar because we can't see neighbors
        1 => { 186 } // Wall only to the north
        2 => { 186 } // Wall only to the south
        3 => { 186 } // Wall to the north and south
        4 => { 205 } // Wall only to the west
        5 => { 188 } // Wall to the north and west
        6 => { 187 } // Wall to the south and west
        7 => { 185 } // Wall to the north, south and west
        8 => { 205 } // Wall only to the east
        9 => { 200 } // Wall to the north and east
        10 => { 201 } // Wall to the south and east
        11 => { 204 } // Wall to the north, south and east
        12 => { 205 } // Wall to the east and west
        13 => { 202 } // Wall to the east, west, and south
        14 => { 203 } // Wall to the east, west, and north
        15 => { 206 }  // ╬ Wall on all sides
        _ => { 35 } // We missed one?
    }
}
}
Lets step through this function:
- If we are at the map bounds, we aren't going to risk stepping outside of them - so we return a
#symbol (ASCII 35). - Now we create an 8-bit unsigned integer to act as our
bitmask. We're interested in setting individual bits and only need four of them - so an 8-bit number is perfect. - Next, we check each of the 4 directions and add to the mask. We're adding numbers corresponding to each of the first four bits in binary - so 1,2,4,8. This means that our final number will store whether or not we have each of the four possible neighbors. For example, a value of 3 means that we have neighbors to the north and south.
- Then we match on the resulting mask bit and return the appropriate line-drawing character from the codepage 437 character set
This function in turn calls is_revealed_and_wall, so we'll write that too! It's very simple:
#![allow(unused)]
fn main() {
fn is_revealed_and_wall(map: &Map, x: i32, y: i32) -> bool {
    let idx = map.xy_idx(x, y);
    map.tiles[idx] == TileType::Wall && map.revealed_tiles[idx]
}
}
It simply checks to see if a tile is revealed and if it is a wall. If both are true, it returns true - otherwise it returns false.
If you cargo run the project now, you get a nicer looking set of walls:

The source code for this chapter may be found here
Run this chapter's example with web assembly, in your browser (WebGL2 required)
Copyright (C) 2019, Herbert Wolverson.
