This tutorial is free and open source, and all code uses the MIT license - so you are free to do with it as you like. My hope is that you will enjoy the tutorial, and make great games!
If you enjoy this and would like me to keep writing, please consider supporting my Patreon.

Adding a Player Entity
Now that we have a rendered map - albeit one showing just open spaces - it's time to add SecBot onto it. It's a good idea to get this in early; it forces you to make the basic game structure, implement turn-based movement, and setup the infrastructure to render and move entities.
Components
We're using an ECS for a data-store (Legion), so SecBot will be the sum of their parts - described by a series of components. Create a new folder, src/components and add a mod.rs file to it. Once again, I went with a slim mod file that describes the components found in other files. The initial mod.rs file looks like this:
#![allow(unused)]
fn main() {
mod description;
mod glyph;
mod position;
mod tags;

pub use description::Description;
pub use glyph::Glyph;
pub use position::Position;
pub use tags::*;
}
Now open src/main.rs and add mod components; to the include list. It's really easy to forget to do this and wonder why nothing works.
The Description Component
I wanted a text description of entities for tooltips. It also gives me a creative outlet, letting me write some text! I really enjoy writing, so that helps keep me happy. Anyway, create a file called description.rs. It contains a one-line component:
#![allow(unused)]
fn main() {
pub struct Description(pub String);
}
That's it. Just a string.
Why didn't I just add
Stringas a component (that works withLegion)? It makes it really tricky to differentiate between what string is serving what purpose. Names are also string-like! So I wrapped it in astruct. It has the nice side-effect of making accessing the contents easier; Legion likes to return&ComponentTypereferences, and it's easier to rememberdesc.0than*descand dealing withStringnot being copyable.
The Glyph Component
Make another file, components/glyph.rs. This is where you store the information required to know what the entity looks like. It's pretty simple:
#![allow(unused)]
fn main() {
use bracket_lib::prelude::*;

pub struct Glyph {
    pub glyph: FontCharType,
    pub color: ColorPair,
}
}
The Position Component
Another file, this time named components/position.rs. Again, it's relatively straightforward:
#![allow(unused)]
fn main() {
use bracket_lib::prelude::Point;

pub struct Position {
    pub pt: Point,
    pub layer: u32,
}

impl Position {
    pub fn with_pt(pt: Point, layer: u32) -> Self {
        Self { pt, layer }
    }
}
}
The Position component contains a Point (an x/y position) and the current layer. I made the layer a u32, and regretted it later due to the number of u32 to usize conversions I wound up using. I figured I'd be making a lot of positions, so I added a constructor.
Tag Components
Legion used to require that you have a tag component for every entity. It doesn't do that anymore, but I still find them useful. A "tag" component is a component with no data - it's mere existence tells you something useful. I started out with a single tag, Player. Create the components/tags.rs file:
#![allow(unused)]
fn main() {
pub struct Player;
}
Now that we have some component types, lets put them to use.
Building SecBot
Open up main.rs. Extend State's new function to call a new_game function on creation:
#![allow(unused)]
fn main() {
impl State {
    fn new() -> Self {
        let mut ecs = World::default();
        let map = map::Map::new(&mut ecs);
        let mut state = Self { ecs, map };
        state.new_game();
        state
    }
}
Then add (implemented as part of State) the new function:
#![allow(unused)]
fn main() {
    fn new_game(&mut self) {
        use components::*;
        self.ecs.clear();

        // Spawn the player
        self.ecs.push((
            Player {},
            Position::with_pt(self.map.get_current().starting_point, 0),
            Glyph {
                glyph: to_cp437('@'),
                color: ColorPair::new(YELLOW, BLACK),
            },
            Description("Everybody's favorite Bracket Corp SecBot".to_string()),
        ));
    }
}
}
The new_game function clears the ECS (in case we are starting over), and spawns a single entity with one of each of the components we created. I wrote about push a lot in Hands-On Rust, so I won't repeat all of that here. Think of it as being like push for a vector - but in this case you are adding to the game world. It adds all of the components contained in the tuple you push to a single entity (and returns the entity, but I didn't use that here).
Render the Bot
Now that you have a player entity, you have everything you need to render it. We'll make a render_glyphs function to find all entities on the map and render them. Add this to the State implementation:
#![allow(unused)]
fn main() {
fn render_glyphs(&self, ctx: &mut BTerm) {
    use components::{Glyph, Position};
    let mut query = <(&Position, &Glyph)>::query();
    query.for_each(&self.ecs, |(pos, glyph)| {
        if pos.layer == self.map.current_layer as u32 {
            ctx.set(
                pos.pt.x + 1,
                pos.pt.y + 1,
                glyph.color.fg,
                glyph.color.bg,
                glyph.glyph,
            );
        }
    });
}
}
Now you need to call it. Find your tick function (in main.rs) and after self.map.render add:
#![allow(unused)]
fn main() {
self.render_glyphs(ctx);
}
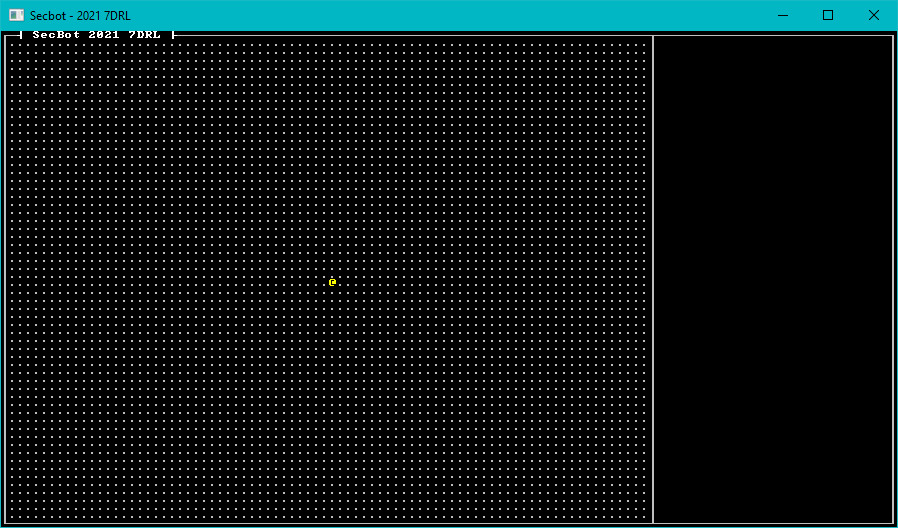
Run the game now - and you'll see a field of open space with an @ on it.
You can find the source code for
hello_entityhere.