This tutorial is free and open source, and all code uses the MIT license - so you are free to do with it as you like. My hope is that you will enjoy the tutorial, and make great games!
If you enjoy this and would like me to keep writing, please consider supporting my Patreon.

Targeting
Now that you can rescue colonists, and they can tell you about their awful day - it's time to start adding an element of risk to the game. I very much see the game as a "bug hunt" - you find monsters and shoot them.
Let's Start by Fixing a Bug
A "bug hunt" is a good description of most time-trial projects. You spend a surprising amount of time finding bugs and mistakes you made in your hasty rush to enter some code!
In the player logic, we'd carefully only run systems like field-of-view is the game state was not equal to Wait. In other words, only if the player was executing an action. Events weren't firing in quite the order I wanted, so I changed all instances of if *new_state != NewState::Wait to if *new_state == NewState::Wait in player.rs - to make them fire when the user has stopped mashing keys.
Create a Name Component
We want to start naming things, so we have a name to display in the targeting panel. Create a new component file named src/components/name.rs:
#![allow(unused)]
fn main() {
#[derive(Debug)]
pub struct Name(pub String);
}
Don't forget to add mod name; pub use name::*; to components/mod.rs.
In map/layerbuilder/colonists.rs add a Name component to each of the colonists you are spawning:
#![allow(unused)]
fn main() {
Name("Colonist".to_string()),
}
It belongs in the push statement for both spawn_random_colonist and spawn_first_colonist.
You also want to open main.rs and give SecBot a name:
#![allow(unused)]
fn main() {
self.ecs.push((
    Player {},
    Name("SecBot".to_string()),
    ...
}
Adding a Monster
The first thing we need is a way to tell the game that a monster is, in fact, a hostile entity. Open up src/components/tags.rs and add another blank structure:
#![allow(unused)]
fn main() {
pub struct Hostile;
}
We're already including tags::* in the module file, so we don't need to add any includes.
Now we want to be able to spawn a monster. We're not going to give it much detail yet, just make it exist. Create a new file, src/map/layerbuilder/monsters.rs. This will contain our monster spawning code:
#![allow(unused)]
fn main() {
use crate::components::*;
use bracket_lib::prelude::*;
use legion::*;

pub fn spawn_face_eater(ecs: &mut World, location: Point, layer: u32) {
    ecs.push((
        Name("Face Eater".to_string()),
        Hostile {},
        Position::with_pt(location, layer),
        Glyph {
            glyph: to_cp437('f'),
            color: ColorPair::new(RED, BLACK),
        },
        Description("Nasty eight-legged beastie that likes to eat faces.".to_string()),
    ));
}
}
The monster shares a lot of functionality with other game elements - it has a position, render information, a description, and a name. It also has the new Hostile tag component, to indicate that it is a baddie. Open src/map/layerbuilder/mod.rs and include pub mod monsters; - this includes the module in the game.
Open src/map/layerbuilder/entrance.rs. In your includes, add use super::monsters::* to include everything from the monsters file. Then find the populate_rooms function and change the random colonist spawner to sometimes spawn a monster instead:
#![allow(unused)]
fn main() {
ooms.iter().skip(1).for_each(|r| {
    if rng.range(0, 5) == 0 {
        spawn_random_colonist(ecs, r.center(), 0);
    } else {
        spawn_face_eater(ecs, r.center(), 0);
    }
});
}
That's enough that if you run the game you'll sometimes find a monster in a room. You can't interact with it, but it's there. The nasty f at least looks menacing!
Targeting
I decided that the next step was to support a targeting system, ready for slaying monsters. Let's start that process.
Create a Targeting Component
Create a new file, src/components/targeting.rs. Add the following code to it:
#![allow(unused)]
fn main() {
use legion::Entity;

pub struct Targeting {
    pub targets: Vec<(Entity, f32)>, // (entity / distance)
    pub current_target: Option<Entity>,
    pub index: usize,
}
}
What we're doing here is storing a vector of all possible targets; it contains tuples of the entity itself and the distance to the entity. Then we store an option for current_target - there might not be one, if there is we'll store its Entity entry. Finally, index stores the index of the current target in the targeting list. We'll be using that for target cycling.
Don't forget to add mod targeting; pub use targeting::*; to your components/mod.rs file.
Rendering Target Information
Make another new file, this time named src/render/targeting_panel.rs. It's contains a large blob of code, so let's walk through each chunk.
#![allow(unused)]
fn main() {
use crate::components::*;
use bracket_lib::prelude::*;
use legion::*;

use super::WIDTH;

pub fn render_targeting_panel(
    mut y: i32,
    ctx: &mut BTerm,
    ecs: &World,
    _current_layer: usize,
) -> (i32, Option<Point>) {
}
This imports necessary modules, and sets up the function. We're accepting y to indicate where we should start rendering in the right panel. Note that y is mutable - but it isn't a reference. This allows us to change our copy of y inside the function without changing the original that was passed in.
We're also ignoring the current_layer variable. I was pretty sure I'd need it later.
The function returns a tuple containing an i32 (which will specify where we are on the vertical axis, since targeting may be of variable size) and an Option<Point> which will specify where the target is - if one exists.
#![allow(unused)]
fn main() {
    let mut target_point = None;
    let x = WIDTH + 3;
    let mut tq = <(&Player, &Targeting)>::query();
    let current_target = tq.iter(ecs).map(|(_, t)| t.current_target).nth(0).unwrap();
}
Here we set target_point to None. We don't know if there is one, yet. Then we set x to WIDTH plus three - the x coordinate at which we can start adding to the panel. Then we query the ECS for entities that have both a Player and a Targeting component (we'll add that to the player soon). There should only be one, so we iterate the query, use map to extract just the current_target field, and retrieve the 1st (0) result. So now current_target contains either None or the Entity we are targeting.
#![allow(unused)]

fn main() {
    ctx.print_color(x, y, GREY, BLACK, "----------------------------");
    y += 1;

}
Print a line to break up the panel a bit, and increment y.
#![allow(unused)]

fn main() {
    if let Some(target_entity) = current_target {
}
Use if let (it's a single option form of match) to extract target_entity if there is one. If there isn't, this block of code won't run at all.
#![allow(unused)]
fn main() {
        // TODO: Retrieve target details here
        if let Ok(entry) = ecs.entry_ref(target_entity) {
            if let Ok(name) = entry.get_component::<Name>() {
}
Use if let once more, to see if entry_ref and get_component return information about our target. entry_ref is Legion's method of saying "I want to inspect this entity" - and returns a handle you can use to access the entity's components. get_component will return a reference to the Name component if there is one.
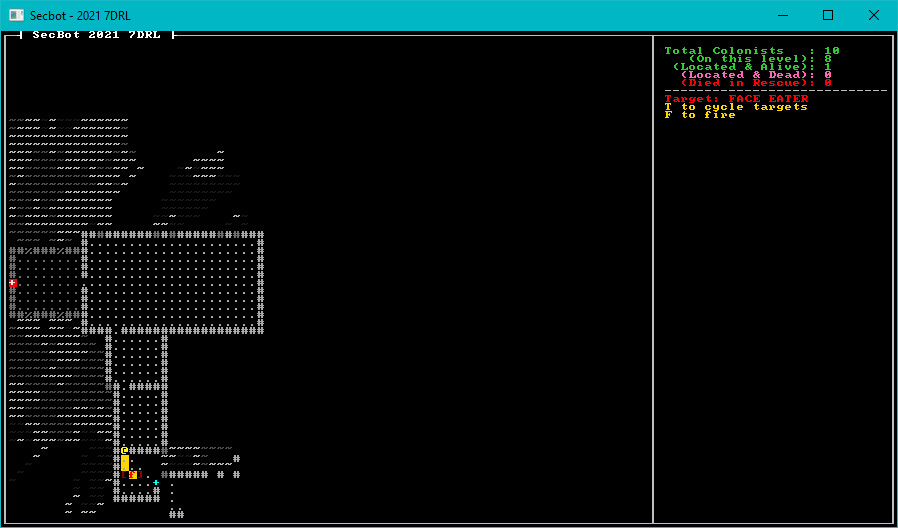
#![allow(unused)]
fn main() {
                ctx.print_color(
                    x,
                    y,
                    RED,
                    BLACK,
                    format!("Target: {}", name.0.to_uppercase()),
                );
                y += 1;
            }
            if let Ok(pos) = entry.get_component::<Position>() {
                target_point = Some(pos.pt);
            }
        }
}
Armed with the name, we can print the target's name (if there is one). We then use the same get_component setup (using the entry) to see if the target has a position. If it does, we set target_point to that location.
#![allow(unused)]
fn main() {
        ctx.print_color(x, y, GOLD, BLACK, "T to cycle targets");
        y += 1;
        ctx.print_color(x, y, GOLD, BLACK, "F to fire");
        y += 1;
    } else {
        ctx.print_color(x, y, GREEN, BLACK, "No current target");
        y += 1;
    }

    (y, target_point)
}
}
Lastly, we print some helpful information for the user - and return y and the target_point.
Don't forget to add pub mod targeting_panel; pub use targeting_panel::*; to src/render/mod.rs.
Note that I initially went with
TABfor target cycling. Running the game in Chrome showed why this was a bad idea. It would work, but also sometimes change the currently highlighted UI element to the browser navigation bar - which made pressing keys a bad idea. I changed it toT.
Rendering the UI, Redux
Now that we've created our targeting panel, we need to use it. We've started down the road of creating dynamically positioned panel elements, so let's build on that. Open main.rs and find the tick function. We're going to modify the UI so that each element returns position information when it finishes - allowing the UI to flow smoothly by itself:
#![allow(unused)]
fn main() {
impl GameState for State {
    fn tick(&mut self, ctx: &mut BTerm) {
        ctx.cls();
        render::render_ui_skeleton(ctx);
        let y = render::render_colonist_panel(ctx, &self.ecs, self.map.current_layer);
        let (y, target_pt) = render::render_targeting_panel(y, ctx, &self.ecs, self.map.current_layer);
        self.map.render(ctx);
}
This requires that we modify the render_colonist_panel to return a y value. Open src/render/colonist_panel.rs. There are two changes to make. The first tells the function to return an i32 (the y value):
#![allow(unused)]
fn main() {
pub fn render_colonist_panel(ctx: &mut BTerm, ecs: &World, current_layer: usize) -> i32 {
}
Then as the last line of the function, you want to return the y value we used when rendering the panel:
#![allow(unused)]
fn main() {
    y
}
}
Giving the Player a Target
Also in main.rs, we want to expand the Player initialization to include a Targeting list:
TODO: Expand this snippet
#![allow(unused)]
fn main() {
fn new_game(&mut self) {
    use components::*;

    // Spawn the player
    self.ecs.push((
        Player {},
        Position::with_pt(self.map.get_current().starting_point, 0),
        Glyph {
            glyph: to_cp437('@'),
            color: ColorPair::new(YELLOW, BLACK),
        },
        Description("Everybody's favorite Bracket Corp SecBot".to_string()),
        FieldOfView{radius: 20, visible_tiles: HashSet::new()},
        Targeting {
            targets: Vec::new(),
            current_target: None,
            index: 0,
        },
    ));
}
}
We also want to correct an issue that would prevent the visible area from rendering in the first turn. Immediately after you push the new player, call:
#![allow(unused)]
fn main() {
// Trigger FOV for the first round
game::player::update_fov(&NewState::Enemy, &mut self.ecs, &mut self.map);
}
Pop into game/player.rs and change fn update_fov to pub fn update_fov to allow you to call it from main.
Finding a Target when you Move
Now we need to modify player behavior to include targeting. The first step is to pick a target when the player moves; new targets may become available, and the player probably wants to shoot one. We'll start by storing some data we need when we query the player:
#![allow(unused)]
fn main() {
let mut visible = None;
let mut player_pos = Point::zero();
let mut player_entity = None;

// Build the player FOV
let mut query = <(Entity, &Player, &Position, &mut FieldOfView)>::query();
query.for_each_mut(ecs, |(e, _, pos, fov)| {
    player_pos = pos.pt;
    player_entity = Some(*e);
    ...
}
When we query the player's information, we store the entity and position for use further along in the function. There's no point in finding it twice! Next, find the update_fov function, and we'll add some new behavior:
#![allow(unused)]
fn main() {
 if let Some(vt) = visible {
    // Update colonist status
    ...

    // Targeting system
    let mut possible_targets = <(Entity, &Hostile, &Position)>::query();
    let mut targets = possible_targets
        .iter(ecs)
        .filter(|(_, _, pos)| pos.layer == map.current_layer as u32 && vt.contains(&pos.pt))
        .map(|(e, _, pos)| (*e, DistanceAlg::Pythagoras.distance2d(player_pos, pos.pt)))
        .collect::<Vec<(Entity, f32)>>();

    targets.sort_by(|a, b| a.1.partial_cmp(&b.1).unwrap());
    let mut commands = legion::systems::CommandBuffer::new(ecs);
    let current_target = if targets.is_empty() {
        None
    } else {
        Some(targets[0].0)
    };
    commands.add_component(
        player_entity.unwrap(),
        Targeting {
            targets,
            current_target,
            index: 0,
        },
    );
    commands.flush(ecs);
}
}
This works by querying the ECS for possible targets - those with a Hostile and Position components. It then filters them to only include entities on the current map layer, and whose position is in the player's visible tiles list. It then maps the query, transforming it into a list of (Entity, Distance From Target) lines. These are then "collected" into a vector.
Next, we sort the vector by distance. We'd like to default to targeting the closest hostile. To avoid borrow-checker issues, it then uses a CommandBuffer to replace the player's Targeting component with a new one containing the new target list, current target and sets the index to 0. You'll see why we use the index in a moment.
Cycling Targets
Next, we move up to the player_turn function (still in player.rs). Let's add a new command to cycle targets:
#![allow(unused)]
fn main() {
pub fn player_turn(ctx: &mut BTerm, ecs: &mut World, map: &mut Map) -> NewState {
    render_tooltips(ctx, ecs, map);

    // Check for input
    let mut new_state = if let Some(key) = ctx.key {
        match key {
            VirtualKeyCode::Up | VirtualKeyCode::W => try_move(ecs, map, 0, -1),
            VirtualKeyCode::Down | VirtualKeyCode::S => try_move(ecs, map, 0, 1),
            VirtualKeyCode::Left | VirtualKeyCode::A => try_move(ecs, map, -1, 0),
            VirtualKeyCode::Right | VirtualKeyCode::D => try_move(ecs, map, 1, 0),
            VirtualKeyCode::T | VirtualKeyCode::Tab => cycle_target(ecs),
            _ => NewState::Wait,
        }
    } else {
        NewState::Wait
    };
    ...
}
We haven't written cycle_target yet. It's a new function, add it to the bottom of the player.rs file:
#![allow(unused)]
fn main() {
fn cycle_target(ecs: &mut World) -> NewState {
    let mut pq = <(&Player, &mut Targeting)>::query();
    pq.for_each_mut(ecs, |(_, targeting)| {
        if targeting.targets.is_empty() {
            targeting.current_target = None;
        } else {
            targeting.index += 1;
            if targeting.index > targeting.targets.len() - 1 {
                targeting.index = 0;
            }
            targeting.current_target = Some(targeting.targets[targeting.index].0);
        }
    });
    NewState::Wait
}
}
This function retrieves the player's Targeting component. If there are no targets, it sets current_target to None. Otherwise, it adds one to the index. If the index exceeds the length of the list, it resets back to zero. Then it sets the current target to the targets list entry at the index.
You can run the game now and see targeting information when you approach monsters.
Debugging the Targeting Data
To help prove to myself that the targeting was valid, I decided to draw a line between the player and their current target. This is a useful tip in general: sometimes decorating the map can make bugs jump out at you.
We returned a target point from the rendering information for this purpose. Let's modify tick in main.rs to send this information to the glyph rendering system:
#![allow(unused)]
fn main() {
impl GameState for State {
    fn tick(&mut self, ctx: &mut BTerm) {
        ctx.cls();
        render::render_ui_skeleton(ctx);
        let y = render::render_colonist_panel(ctx, &self.ecs, self.map.current_layer);
        let (y, target_pt) =
            render::render_targeting_panel(y, ctx, &self.ecs, self.map.current_layer);
        self.map.render(ctx);
        render::render_glyphs(ctx, &self.ecs, &self.map, target_pt);
}
You probably guessed that the next step is to open render/mod.rs and make use of the target_pt we are sending. Replace the function as follows:
#![allow(unused)]
fn main() {
pub fn render_glyphs(ctx: &mut BTerm, ecs: &World, map: &Map, target_pt: Option<Point>) {
    let mut player_point = Point::zero();
    let mut query = <(&Position, &Glyph)>::query();
    query.for_each(ecs, |(pos, glyph)| {
        if pos.layer == map.current_layer as u32 {
            let idx = map.get_current().point2d_to_index(pos.pt);
            if map.get_current().visible[idx] {
                ctx.set(
                    pos.pt.x + 1,
                    pos.pt.y + 1,
                    glyph.color.fg,
                    glyph.color.bg,
                    glyph.glyph,
                );
                if glyph.glyph == to_cp437('@') {
                    player_point = pos.pt;
                }
            }
        }
    });

    if let Some(pt) = target_pt {
        line2d_bresenham(player_point, pt)
            .iter()
            .skip(1)
            .for_each(|pt| {
                ctx.set_bg(pt.x + 1, pt.y + 1, GOLD);
            });
        ctx.set(pt.x, pt.y + 1, DARK_RED, BLACK, to_cp437('['));
        ctx.set(pt.x + 2, pt.y + 1, DARK_RED, BLACK, to_cp437(']'));
        ctx.set_bg(pt.x + 1, pt.y + 1, GOLD);
    }
}
}
This is essentially the same, but when we render the @ - we store the player position for future use. Then, if there is a target_pt - we plot a line from the player to the point. We skip the first tile (it will be the player) and set the background to be gold on each tile along the way.
Then we add a [ and ] around the target.
It turned out that my code worked. :-) I didn't really need the debug data - but I found it useful to prove to myself that it wasn't terrible!
Try it Out
Run the game now. You can move around, and when you encounter monsters they are targeted - with a line showing the current targeting path. Sometimes, you can see more than one monster at a time. Press T (or tab) and you can switch targets.
You can find the source code for
hello_monstershere.
Next up
This concluded my second day of development. On the third day, we'll dive into shooting things, props, and starting to make staircases functional.