This tutorial is free and open source, and all code uses the MIT license - so you are free to do with it as you like. My hope is that you will enjoy the tutorial, and make great games!
If you enjoy this and would like me to keep writing, please consider supporting my Patreon.

Initial Mapping
Now that you have a field of open space and a player entity, let's make something more interesting for SecBot to stand on.
The Layer Builder Module
Open up src/map/mod.rs and uncomment mod layerbuilder. Then make a directory, src/map/layerbuilder and create a new mod.rs file in it. It's very much a skeleton for all the builders to reside in:
#![allow(unused)]
fn main() {
mod entrance;
use super::{Layer, Tile};
pub use entrance::build_entrance;

fn all_space(layer: &mut Layer) {
    layer.tiles.iter_mut().for_each(|t| {
        *t = Tile::empty();
    });
}
}
I added a helper function, all_space that iterates an existing layer and turns every tile into an empty tile. You'll implement the empty funtion next.
Add Some Tiles
Open map/tiles.rs and create a bunch of constructors for different tile types we'll need:
#![allow(unused)]
fn main() {
impl Tile {
    pub fn default() -> Self {
        Self {
            glyph: to_cp437('.'),
            color: ColorPair::new(GREY, BLACK),
            blocked: false,
            opaque: false,
        }
    }

    pub fn empty() -> Self {
        Self {
            glyph: to_cp437('#'),
            color: ColorPair::new(DARK_GRAY, BLACK),
            blocked: true,
            opaque: false,
        }
    }

    pub fn capsule_floor() -> Self {
        Self {
            glyph: to_cp437('.'),
            color: ColorPair::new(DARK_CYAN, BLACK),
            blocked: true,
            opaque: false,
        }
    }

    pub fn game_over() -> Self {
        Self {
            glyph: to_cp437('+'),
            color: ColorPair::new(YELLOW, RED),
            blocked: true,
            opaque: false,
        }
    }
}
}
This is pretty tedious, but I find it helpful when designing a map to have a nicely named function for whatever it is that I'm making. The functions are:
defaultandemptyboth make an open space. I changed the color slightly so I could see if I'd remembered to useempty.capsule_floormakes a cyan floor. This will form floor tiles in SecBot's spaceship.game_overdraws a red plus sign with a yellow background. This will be the game's exit. Entering this tile will end the game and show you how far you progressed.
Make SecBot's Ship
Back in map/layerbuilder make a new file, entrance.rs. This is where we will construct the first game level - layer zero. Start by using various things we're likely to need:
#![allow(unused)]
fn main() {
use super::all_space;
use crate::{
    components::{Description, Position},
    map::{Layer, Tile, HEIGHT, TILES, WIDTH},
};
use bracket_lib::prelude::*;
use legion::*;
}
Now create a public function called build_entrance to initialize the layer:
#![allow(unused)]
fn main() {
pub fn build_entrance(ecs: &mut World) -> Layer {
    let mut layer = Layer::new(std::usize::MAX, ecs); // Gets a default layer

    all_space(&mut layer);
    add_docking_capsule(&mut layer, ecs);

    layer
}
}
We'll get to the functions it calls in a moment, first you need to pop back into map/layer.rs and extend it to use the layer builder:
#![allow(unused)]
fn main() {
use super::{layerbuilder::*, Tile, HEIGHT, TILES, WIDTH};
use bracket_lib::prelude::*;
use legion::*;

pub struct Layer {
    pub tiles: Vec<Tile>,
    pub starting_point: Point,
}

impl Layer {
    pub fn new(depth: usize, ecs: &mut World) -> Self {
        let layer = match depth {
            0 => build_entrance(ecs),
            _ => Self {
                tiles: vec![Tile::default(); TILES],
                starting_point: Point::new(WIDTH / 2, HEIGHT / 2),
            },
        };
        layer
    }
    ...
}
If depth comes into the layer constructor as zero, it will call the build_entrance function in the layer builder. Otherwise, it makes a default map.
Building SecBot's Docking Bay
The build_entrance function starts by making a new layer. Note that it calls it with the "depth" set to the maximum usize value:
#![allow(unused)]
fn main() {
let mut layer = Layer::new(std::usize::MAX, ecs); // Gets a default layer
}
This prevents the layer from calling build_entrance - crashing the program when the stack overflows because the two functions are calling each other over and over.
It then calls all_space to set the entire map to open space. You don't really need this (initializing the layer clears it) - but I find it clearer to be explicit about it.
The next function it calls is add_docking_capsule. Add the following function to entrance.rs:
#![allow(unused)]
fn main() {
fn add_docking_capsule(map: &mut Layer, ecs: &mut World) {
    const MIDDLE: usize = HEIGHT / 2;
    const TOP: usize = MIDDLE - 3;
    const BOTTOM: usize = MIDDLE + 3;
    const LEFT: usize = 1;
    const RIGHT: usize = 8;

    for y in TOP..=BOTTOM {
        for x in LEFT..=RIGHT {
            let idx = map.point2d_to_index(Point::new(x, y));
            map.tiles[idx] = Tile::capsule_floor();
        }
    }

    // Spawn the game exit
    add_game_exit(map, ecs, Point::new(LEFT - 1, MIDDLE));

    map.starting_point = Point::new(LEFT + 1, MIDDLE);
}
}
This starts by doing a little constant math (calculated at compile time). The y axis middle of the map, and the position of the docking capsule. There's nothing random here; it will always be the same. Armed with these constants, it fills the region defined by these coordinates with capsule_floor tiles.
Adding the exit
The docking capsule function calls another function. Let's add it:
#![allow(unused)]
fn main() {
fn add_game_exit(map: &mut Layer, ecs: &mut World, pt: Point) {
    let exit_idx = map.point2d_to_index(pt);
    map.tiles[exit_idx] = Tile::game_over();

    ecs.push((
        Position::with_pt(pt, 0),
        Description(
            "Exit to SecBot's Ship. Leave through here when you are ready to call it game over."
                .to_string(),
        ),
    ));
}
}
This adds the exit tile to the map, and creates a new entity to display a tool-tip (when we have that in!) to show you that the tile represents an exit.
Next, open up mod.rs and uncomment the line that imports layerbuilder.
You'll notice that the game still doesn't compile. That's because we used point2d_to_index - which is provided by bracket-lib's trait system.
Trait Implementation
Open map/layer.rs, and we'll cover all of the boilerplate required to use bracket_lib's map helpers. We'll be using these a lot during development, so it's worth the effort. We'll go ahead and make the changes required for path-finding while we're here.
Defining Algorithm2D
At the bottom of the layer.rs file, add an implemenetation for Algorithm2D:
#![allow(unused)]
fn main() {
impl Algorithm2D for Layer {
    fn dimensions(&self) -> Point {
        Point::new(WIDTH, HEIGHT)
    }

    fn in_bounds(&self, pos: Point) -> bool {
        pos.x >= 0 && pos.x < WIDTH as i32 && pos.y > 0 && pos.y < HEIGHT as i32
    }
}
}
dimensions specifies the size of the layer. in_bounds checks that a tile is within those boundaries. This is straight out of Hands-On Rust and is a good starting point for all of bracket-lib's mapping algorithms. Implementing these provides point2d_to_index and the reciprocal index_to_point2d. We're not trying anything clever with our map tile striding, so these work perfectly for our needs.
Testing Exits
Inside the implementation of Layer, add a function:
#![allow(unused)]
fn main() {
impl Layer {
    ...
    fn test_exit(&self, pt: Point, delta: Point, exits: &mut SmallVec<[(usize, f32); 10]>) {
        let dest_pt = pt + delta;
        if self.in_bounds(dest_pt) {
            let dest_idx = self.point2d_to_index(pt + delta);
            if !self.tiles[dest_idx].blocked {
                exits.push((dest_idx, 1.0));
            }
        }
    }
}
}
This function takes a point and a delta (desired movement) and checks that the reuslt is on the map. If the tile is on the map, and isn't blocked, it adds the exit to the exits list with a cost of 1.
Implement BaseMap
You now have everything you need to make BaseMap work. BaseMap is a handy trait. It's enough to make Dijkstra maps, A-Star searches and Field-of-View queries work. Add the following to the bottom of layer.rs:
#![allow(unused)]
fn main() {
impl BaseMap for Layer {
    fn is_opaque(&self, idx: usize) -> bool {
        self.tiles[idx].opaque
    }

    fn get_available_exits(&self, idx: usize) -> SmallVec<[(usize, f32); 10]> {
        let mut exits = SmallVec::new();
        let pt = self.index_to_point2d(idx);
        self.test_exit(pt, Point::new(-1, 0), &mut exits);
        self.test_exit(pt, Point::new(1, 0), &mut exits);
        self.test_exit(pt, Point::new(0, -1), &mut exits);
        self.test_exit(pt, Point::new(0, 1), &mut exits);
        exits
    }
}
}
Wrap-Up
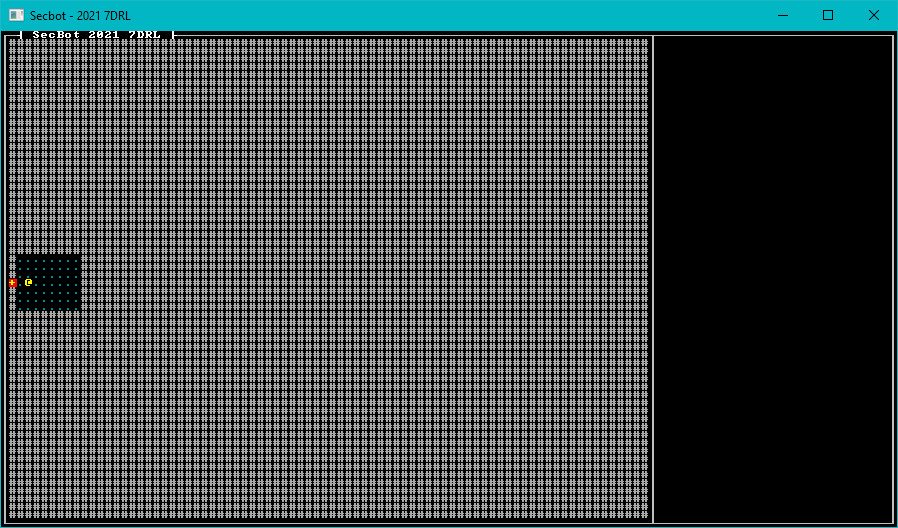
If you run the program now, you'll see a docking capsule (without walls!) sitting on a field of open space.
You can find the source code for
hello_capsulehere.
Next up - adding some more elements that I'll need throughout development.